Note: this article is part of the Amiga Tech video 'Amiga Tech Update - Audio Mixing V2.0 for Games'. Since then, the Audio Mixer has become a full fledged project with many improvements. For the full project, see the Audio Mixer project.
I originally wrote this article in April 2019. Since then, I've revisited the Audio Mixer - armed with new insights given to me by none other than Rhino of the Batman Group, who came up with a way to massively improve the performance of the mixer. I have implemented those performance improvements and made some other changes, making the mixer better suited for actual use in games. The article below has been altered to take into account this new and improved version, which naturally can be downloaded as well. Of particular interest might be the performance tab, which shows just how much faster the new version really is.
Back in the early 1990's, I came across a rather interesting piece of software for my Commodore Amiga: OctaMed. This was a music editor that allowed you to use 8 channels rather than the more common 4 (which is the number of channels the Amiga's sound chip natively supports). Now, the sound quality provided by the early versions of OctaMed wasn't all that good and the program used a lot of resources to be able to mix the channels in real time, but it did work.
Later, I learned that the reason the Turrican II title tune sounded so great and seemed to transcend the Amiga's limits was that it also managed to mix in additional audio channels during playback - though this time it was a total of 7 channels rather than 8.
Fast forward to early 2019, when I pondered about the feasibility of real time audio mixing in a thread over on the eab.abime.net forum. Considering you're reading an Amiga Tech article called 'Audio Mixing for Games', you can probably guess where this is going...
Audio Mixing for Games
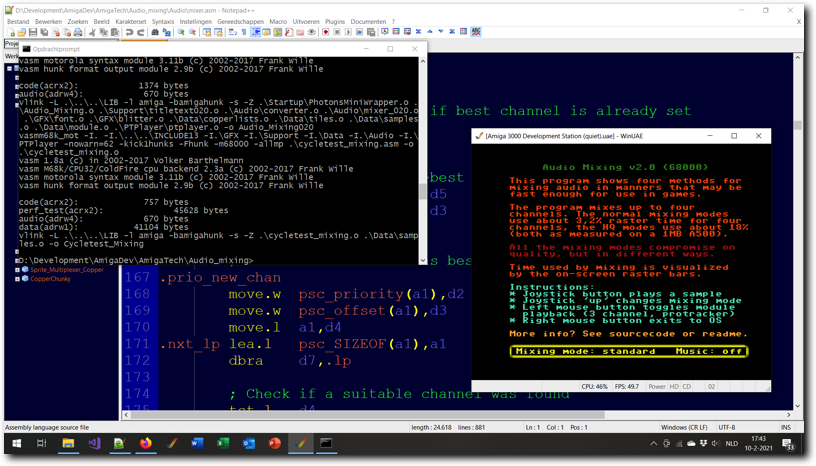
Above: testing the Audio Mixing v2.0 program in WinUAE.
Yup, I decided to try and find a manner to mix samples in real time that would still be fast enough for use in games on a basic A500. And in this article, I'll be discussing the result of that effort and show what compromises I made on quality and quantity of mixed channels. And, of course, I'll also offer up the complete source code for the mixing routines I came up with.
The basic idea here was to avoid as much work as possible, as the 68000 in the A500 would struggle to keep up if it had to do all the work in real time. So, the samples are preprocessed at the start of the program* instead of real-time during mixing and the sample rate is fixed to prevent code which checks when to mix in what sample.
I also considered the A1200 as a target and have made both a version of the code that runs faster on a 68020 than the 68000 version of the code as well as a second type of mixing samples that is higher quality, but probably is too slow for use in games on the A500. This second mixing type is based on an idea offered by pandy71 over on the English Amiga Board.
Since the original release, I also implemented long-word based mixing for the standard mixer, sample priorities and sample overwriting. These changes make the mixer much faster than before and offer more flexibility when playing back samples. Overall, the performance is (much) better than I expected and the audio quality for both types of mixing seems to be good enough for actual use in games.
*) This is something that could be done outside of the program itself - the preprocessing done in the program is very simplistic and better quality can probably be obtained by doing it ahead of time using better software.
- Overview
- Audio Mixing Basics
- Standard Mixer
- HQ Mixer
- Performance
Tab 1
The example program allows you to play back a three channel Protracker module and mix up to four additional samples playing on the fourth voice. The four extra samples are mixed real time in software using the mixing routines supplied. The sample frequency of the mixed samples is always set to roughly 11025Hz.
These limitations are (mostly) in place to deliver good baseline performance.
However, the actual mixing code itself supports any valid sample rate Paula can play back and allows for mixing up to four channels if desired*. Of course, mixing at a higher frequency or mixing in more channels will lower performance. Likewise, lowering the frequency or limiting the mixing to a maximum of two channels will increase performance.
It may also be worth noting that a side effect of the way the program works is that source samples that are to be mixed can be stored anywhere in RAM, so samples can be stored in Fast RAM as well as Chip RAM.
The example program consists of an interrupt driven mixer, two mixing routines, two preprocessor routines, the Protracker player (altered to only use three voices) and a main program that allows selection of mixing method, toggling of music and of course the playing back of samples through the mixer. There are two versions of the program, one optimised for Amiga's running a 68000 and one optimised for Amiga's running a 68020 or higher (though both versions should run on all Amiga's).
Note: switching between the four options of mixing/pre-processing modes results in the playback volume changing for both samples and the Protracker player. Sample volume changes as a natural result of different mixing methods, Protracker volume has been manually adjusted by me to not have (much) louder music than sound effects.
The two mixing modes are 'standard mode', in which samples have to be pre-processed to limit their maximum amplitude to allow for error free mixing and 'high quality mode', in which pre-processing is not required.
The two pre-processing modes are 'division', in which all sample data has it's amplitude divided by the number of channels to mix and 'compression', in which sample data is passed through a simple limiter which forces the high amplitude parts of the samples to be within the maximum allowable range but leaves all parts of the sample that already 'fit' as they are.
The mixer itself is supplied with a set of routines to set it up and a routine to play back a sample by adding it to the mix. This routine will automatically limit the number of samples mixed to the maximum supported, but currently does not support sound effects priorities. The mixing buffer is fairly small, so playback latency is limited to about 1 frame.
For more information on the mixer routines themselves and the performance, check the other tabs in this article. For a quick introduction to how mixing samples works, see the 'Audio Mixing Basics' tab.
As is, the program has been assembled for PAL Amiga's and so will play back samples at the wrong rate on an NTSC system. This can easily be changed by changing the period value/buffer size in the file mixer.i and reassembling. A single PAL/NTSC executable is possible, but due to unrolled loops the 68000 executable that would be the result would be significantly bigger than it is currently.
*) The mixing rate or maximum number of channels can be changed in mixer.i (to a maximum of 4 channels and roughly 28KHz mixing rate).
Tab 2
When I started making this example, I decided to first research how to mix two audio samples together correctly. It took a while to find the correct method and to my surprise it turned out to be remarkably simple. However, despite the ease of correct audio mixing, there seems to be a lot of confusion about the subject as well.
This confusion seems to be especially notable when it comes to mixing multiple 'loud' sounds without distortions ending up in the end result. With these things in mind, I've decided to add this section on the basics of audio mixing.
So lets get started. Suppose we want to mix the following two 8-bit samples:
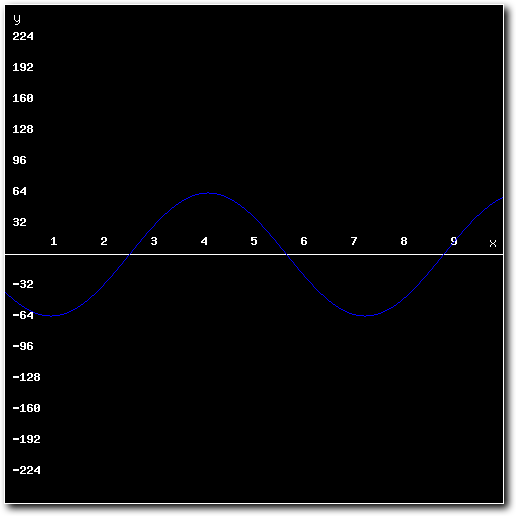
Above: 1st sample to mix.
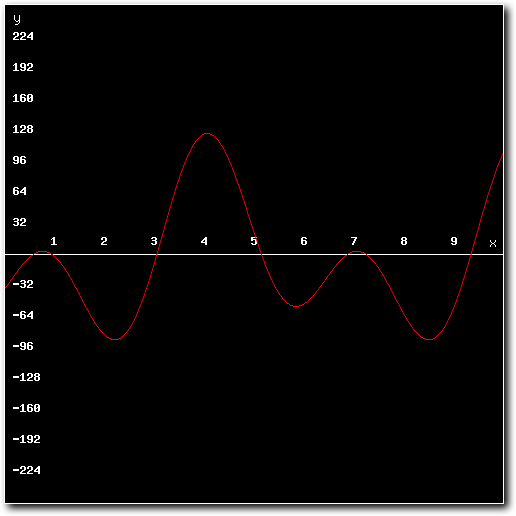
Above: 2nd sample to mix.
To know how to do this correctly, we should first know what samples actually are. They are digital (numeric) representations of sound. In short, if we know how two sounds mix together in the physical world, we also know how to mix two samples together.
Now, the physics of sound are quite complicated and deal with many different aspects of both the medium and what actually produces sound. However, for the purposes of mixing samples it is enough to know that a sound is a vibration of air that propagates as a wave. In other words, a sample is a numerical representation of a wave.
And in mathematics, adding two waves together results in the mixed form of those waves. So we can conclude that the correct way to mix two samples (which are numerical representations of waves) together is to add both samples together.
To complete the puzzle, we need to know how samples numerically represent waves. As it turns out, the clue is in the name: sample. To create a sample, the sampler measures (or 'samples') the amplitude of the audio wave that it is trying to capture at a rapid (but constant) rate and converts the amplitude measured into numerical values. The sample rate is the frequency of the samples as measured in Hz. The number of bits (8/16/24) a sampler generates refers to the number of steps a single measured amplitude value can have between it's minimum and maximum value. For 8 bits this is 256, for 16 bits 65536, etc.
The result is a set of numbers, each representing the amplitude of the wave at a certain point in time. So, to mix two samples that have the same sample rate and bit depth, all that is needed is to step through both sets of sample data and add the values for each step - the added values are the resulting mixed sample. If two samples have a different sample rate or bit depth, a conversion step will be needed.
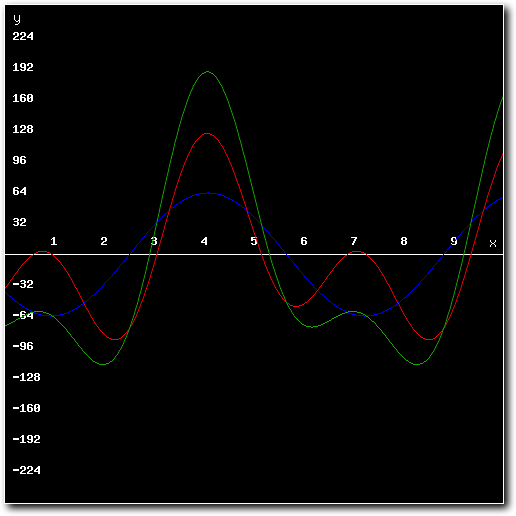
Above: both samples and the mixed result.
Above: the mixed result.
And, errr, that's it. Nothing more. There are no correct* ways to mix two samples that differ in approach. All other ways to mix samples are designed for only one purpose: to get around the problem of maximum amplitude.
See, in nature there might not be a real limit to how high the amplitude of a sound wave can get**. For computers playing samples however, the limits are clearly defined. This means that you can't arbitrarily keep adding samples together - eventually, you'll hit the maximum amplitude values that can be stored.
Going over these values can introduce (massive) distortion as sample values could flip from positive to negative due to overflow, or have to be clamped to a number that is too small to accurately represent the wave (which also introduces distortion).
To get around this, there are two options: use a mixer (analog or digital) to mix the audio that has a much higher maximum output amplitude than it allows as input (this is how analog or digital hardware for mixing audio actually works). The other option is to somehow limit the maximum amplitude of the mixed signal, either by limiting/altering the input or by limiting/altering the output.
In short, it's important to realise that any software mixer that purports to make it possible to mix samples together while not requiring headroom in the source samples will inevitably lead to distortion once too many samples or samples that are too loud are mixed. Ironically, it's generally (but not always) true that the more advanced the software solution for mixing samples gets, the more it'll distort the audio mixed. Note here that this even goes for audio editing software, which tends to weigh samples to be mixed relative to the loudest one in the mix and then rescale the output (which introduces some level of distortion).
In the example program I made, I had to use a software solution to prevent overflow and ended up using two algorithms for mixing: the standard mixer, which simply adds values together and the HQ mixer, which does real-time limiting/value clamping. For the standard mixer I had to pre-process the samples as well to prevent overflow. More information of how this works and how the pre-processors or mixers distort the audio can be found on the relevant tabs.
*) Correct in the sense of not introducing distortion (audible or otherwise).
**) This does depends on how you define 'sound' though, there are some interesting discussions about this online - one source states the maximum loudness of a 'real sound' on Earth would be around 194dB as any more would require the troughs of the wave to have a pressure below that a pure vacuum (which is impossible). Note though that other sources point to much higher numbers, such as over 380dB for volcanoes exploding.
Tab 3
The standard mixing method uses the most basic of ways imaginable for mixing multiple samples*, namely it simply iterates over the individual data points in the source samples and adds them together into resulting output sample data points and then plays the resulting output.
To prevent high CPU overhead, no re-sampling, pre-processing, limiting or clamping is done and all additions commands are strictly signed 32-bit (operating on four bytes at once) - note the original version used 8-bit operations instead. To keep latency acceptable, the mixing routine only mixes small parts of the sample at a time and uses interrupts to know when to mix more data. In the example program the mixing buffer is roughly one frame in size, mostly to keep overhead roughly equal between frames.
As a result of the above, this mixing algorithm expects samples to be pre-processed so that no re-sampling or output limiting is needed. This means the maximum amplitude of the source samples has to be equal to 128 divided by the number of channels that are to be mixed and all samples offered to the mixing algorithm must have the same sample rate.
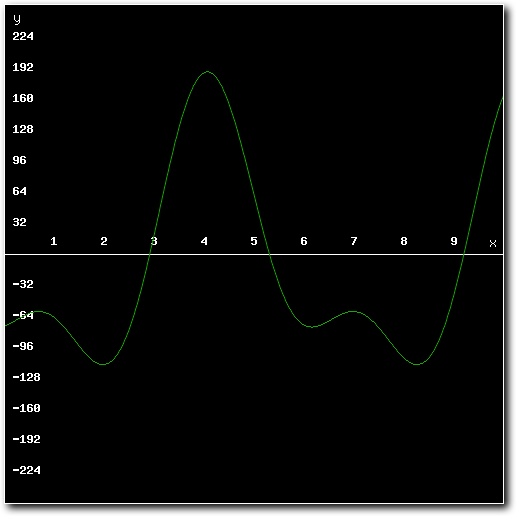
To see why this is, consider the following mixed result (assuming for the moment that the routine adds numbers without the 8bit limit):
To prevent high CPU overhead, no re-sampling, pre-processing, limiting or clamping is done and all additions commands are strictly signed 32-bit (operating on four bytes at once) - note the original version used 8-bit operations instead. To keep latency acceptable, the mixing routine only mixes small parts of the sample at a time and uses interrupts to know when to mix more data. In the example program the mixing buffer is roughly one frame in size, mostly to keep overhead roughly equal between frames.
As a result of the above, this mixing algorithm expects samples to be pre-processed so that no re-sampling or output limiting is needed. This means the maximum amplitude of the source samples has to be equal to 128 divided by the number of channels that are to be mixed and all samples offered to the mixing algorithm must have the same sample rate.
To see why this is, consider the following mixed result (assuming for the moment that the routine adds numbers without the 8bit limit):

Above: mixing result after mixing several unprocessed samples together.

Above: mixing result exceeds minimum or maximum values possible for 8-bit samples.
As the images show, some of the resulting output data exceeds the limits of a signed 8-bit number. If such a result was output to Paula it would be interpreted as a signed 8-bit number and there would be serious audible distortion. As such, steps must be taken to ensure the result of the additions done by the mixing routine never exceed the limits of an 8-bit number.
To do so, the samples to be mixed are pre-processed. The example program offers two different ways to pre-process samples, but this can also be done using audio editing software which will probably allow for higher quality pre-processing.
The two different pre-processor routines supplied in the example are either 'division' or 'compression'. Both will (potentially) alter the source sample's values and thus introduce distortion. Depending on preference and requirements, one may be better suited than the other.
At any rate, both these methods will make sure that the resulting mix never overflows the 8-bit limits - which makes the output mix much higher quality than not using them.
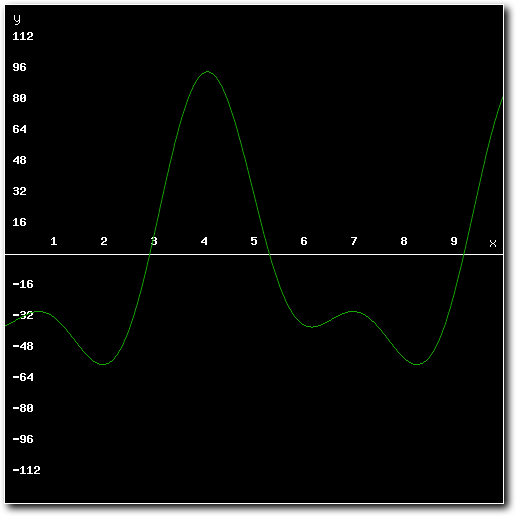
Above: example mixed result using pre-processed samples.
The 'division' preprocessor limits maximum amplitude of the source samples by dividing each sample value by the number of output channels required. This will result in much quieter samples, but other than the lower output volume no further distortion is introduced. This is essentially the same method as used by early versions of Octamed and is the more 'pure' of the two pre-processors.
The 'compress' preprocessor limits maximum amplitude of the source samples by scanning each sample value and limiting it to the maximum value allowed for the number of channels that can be mixed. This value is either 127/number of channels for positive amplitude values or -128/number of channels for negative values. This will result in notably louder sample playback, but the loudest parts of the source sample can get audibly distorted. As such, it is the less 'pure' of the two pre-processors.
Which of the two is best depends on personal preference. I've personally found that the 'compress' method can sound very impressive if the source samples require little in the way of actual compression, but that the 'division' method is more consistent.
*) For more information on why this method works, see the 'Audio Mixing Basics' tab.
Tab 4
The high quality mixing method uses a slightly more complex method of mixing samples than the standard mode. Like the standard method, the high quality method is based on adding sample values together to mix samples*. It also requires all source samples to use the same sample rate. However, unlike the standard method, it handles overflow in real time.
Because it handles overflow in real time, the high quality mixer can use samples that are not pre-processed. This means any 8-bit sample can be mixed using the high quality mixer and that playback volume is not negatively affected by mixing samples. However, there is a problem.
This method is far more CPU intensive than the standard method and as such is better suited for the A1200 (or other Amiga's with a 68020 or better). It was also not updated to read/write longwords instead of bytes because no performance benefit seemed to be achieved this way. To keep latency acceptable, the mixing routine only mixes small parts of the sample at a time and uses interrupts to know when to mix more data. In the example program the mixing buffer is roughly one frame in size, mostly to keep overhead roughly equal between frames.
To see how the algorithm works and what the pros and cons of are, let's consider the following mixed result:

Above: standard mixing result after mixing several samples together.
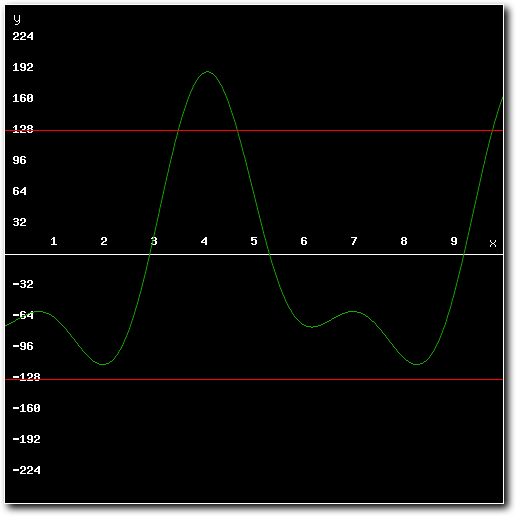
Above: mixing result exceeds minimum or maximum values possible for 8-bit samples.
As can be seen in the images, the mixed result clearly exceeds the maximum amplitude for 8-bit samples. Playing back these results through Paula would result in massive distortion. To prevent this from happening, the high quality mixer adds all of the source samples using 16 bit math rather than 8 bit math. This allows for intermediate results that exceed the 8-bit maximums**.
If a mixed intermediate value does not exceed the maximums of signed 8-bit numbers, the algorithm simply stores it in the output buffer.
However, if a mixed intermediate value does exceed 8-bits maximums, the algorithm does two things:
This is called error feedback rounding and is based on the idea that digital signal processing should not 'throw anything away' (a full discussion of error feedback rounding is obviously outside of the scope of this article). Now, the resulting output of this method obviously has distortion compared to the expected results if no such algorithm were necessary.
Given this distortion, why then is this the 'high quality' mixer?
If a mixed intermediate value does not exceed the maximums of signed 8-bit numbers, the algorithm simply stores it in the output buffer.
However, if a mixed intermediate value does exceed 8-bits maximums, the algorithm does two things:
- It sets (limits) the output value to the maximum (or minimum) value supported by signed 8-bit numbers.
- It takes the least significant bits that would be lost this way and adds them to the next intermediate result.
This is called error feedback rounding and is based on the idea that digital signal processing should not 'throw anything away' (a full discussion of error feedback rounding is obviously outside of the scope of this article). Now, the resulting output of this method obviously has distortion compared to the expected results if no such algorithm were necessary.
Given this distortion, why then is this the 'high quality' mixer?
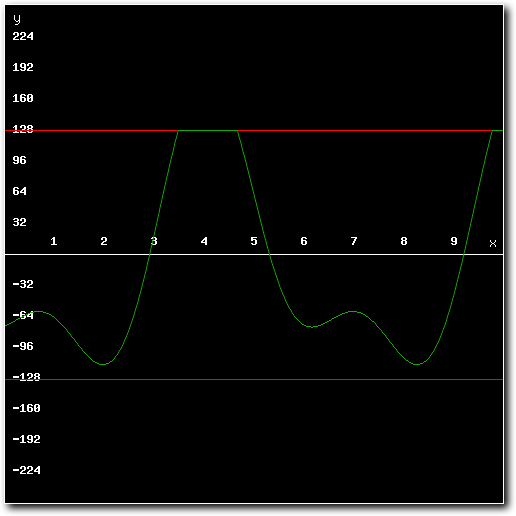
Above: example mixed result using mixer with real-time limiter.
Well, that has to do with two things. The first is that this method never needs any alterations to be done to the source samples ahead of mixing. Which means that the source samples are 'high quality' compared to those which have been pre-processed (and thus distorted and 'low quality'). Apart from better source sample resolution this also means that the mixed result will be as 'loud' as the original.
The second reason to call this high quality is because it generally distorts samples less frequently than the standard mixer. Now, it is certainly true that audible distortion can be the result of using this method. However, generally this distortion will be fairly uncommon - it only happens if values in the source samples added together exceed 8-bit limits. In many cases that only happens for small parts of the output mix.
The standard mixer on the other hand, requires pre-processed samples which (depending on the pre-processing method used) are distorted either all the time or at any time 'loud' parts of the sample occur. Meaning that the samples offered to the standard mixer are already distorted, even if this would not be required for the mix, while the samples offered to the high quality mixer only end up leading to distortion if and when the resulting output requires it.
And in practice this usually leads to an end result with less distortion and of higher (perceived) quality.
*) For more information on why this works, see the 'Audio Mixing Basics' tab.
**) The minimum value that can be stored by a signed 8-bit number is -128. The maximum is 127.
Tab 5
A key element for this effect being a success was performance. By using unrolled loops for the 68000 version (and making sure the loops fit inside the cache for the 68020+ version) and after quite a bit of cycle counting, the performance delivered is quite good. It's certainly better than I had anticipated it to be when I started. The new version, which uses longwords based operations rather than byte based operations is especially quick.
To test performance, I've made a separate executable which runs the mixing code (with some very minor changes due to no actual audio or interrupts being used) while displaying a blank 4 bitplane lores screen and times the results using the CIA timer.
I've run this program on my real A600 (68000@7MHz/2MB Chip memory), my real A1200 (68020@14Mhz/2MB Chip memory) and an emulated A500 (WinUAE 4.10/Cycle-Exact/68000@7MHz/0.5MB Chip memory/0.5MB Slow memory). The differences between the A600 and the emulated A500 were small enough to not be relevant.
The results can be found in the following tables (A500 running 68000 version, A1200 running 68020+ version). Note that the results are in CIA timer ticks, which are on a (roughly) 709KHz cycle*.
show
show
show
show
show
show
show
Standard mixer (V2.0)
CIA timer ticks
% of PAL frame
A500 - 2 channels@11KHz
268
1,9% (2,16x faster)
A500 - 3 channels@11KHz
364
2,6% (2,08x faster)
A500 - 4 channels@11KHz
454
3,2% (2,07x faster)
A1200 - 2 channels@11KHz
152
1,1% (3,02x faster)
A1200 - 3 channels@11KHz
195
1,4% (3,17x faster)
A1200 - 4 channels@11KHz
239
1,7% (3,28x faster)
show
show
show
show
show
show
show
Standard mixer (V1.0)
CIA timer ticks
% of PAL frame
A500 - 2 channels@11KHz
580
4,1%
A500 - 3 channels@11KHz
756
5,3%
A500 - 4 channels@11KHz
938
6,6%
A1200 - 2 channels@11KHz
459
3,2%
A1200 - 3 channels@11KHz
618
4,4%
A1200 - 4 channels@11KHz
784
5,5%
show
show
show
show
show
show
show
High quality mixer
CIA timer ticks
% of PAL frame
A500 - 2 channels@11KHz
1726
12,2%
A500 - 3 channels@11KHz
2143
15,1%
A500 - 4 channels@11KHz
2554
18,0%
A1200 - 2 channels@11KHz
765
5,4%
A1200 - 3 channels@11KHz
920
6,5%
A1200 - 4 channels@11KHz
1170
8,3%
To see what difference a lower sample rate makes, I've also tested 3 channel mixing performance for 8KHz samples. The results of that test are as follows:
show
show
show
Standard mixer (V2.0)
CIA timer ticks
% of PAL frame
A500 - 3 channels@8KHz
290
2,0% (1,92x faster)
A1200 - 3 channels@8KHz
135
1,0% (3,39x faster)**
show
show
show
Standard mixer (V1.0)
CIA timer ticks
% of PAL frame
A500 - 3 channels@8KHz
559
3,9%
A1200 - 3 channels@8KHz
458
3,2%
show
show
show
High quality mixer
CIA timer ticks
% of PAL frame
A500 - 3 channels@8KHz
1586
11,2%
A1200 - 3 channels@8KHz
707
5,0%
*) CIA timer ticks occur at 1/5th of the rate of the OCS chipset clock (or if you prefer, 1/10th of the OCS 68000 7MHz clock). This is roughly 709KHz for PAL or 715KHz for NTSC.
**) The A1200/3 channel/8KHz measurement fluctuated a bit, this is an average. The highest I measured was around 1,05% - the lowest around 0,95%.
**) The A1200/3 channel/8KHz measurement fluctuated a bit, this is an average. The highest I measured was around 1,05% - the lowest around 0,95%.
While I am indeed rather happy with the results (especially for the new, much faster version), I do feel it's important to point out that mixing audio like this is a compromise. Both the standard and high quality mixing modes have to work within the Amiga's hardware limits and this does pose somewhat of a challenge. Disregarding CPU speed, the main problem here is the low sample resolution - the Amiga only offers 8-bit samples. The direct consequence of this is that the dynamic range of the samples is rather low. To combat this, many samples designed to play back on the Amiga were/are recorded using a minimum of headroom - which maximises use of the available range.
The issue here is that mixing multiple samples together essentially means adding the individual sample values. This requires headroom to avoid overflows or clipping. This is dealt with in the program by either pre-processing the samples to force enough headroom for mixing to exist, or by limiting the output value of the mixer to the respective minimum or maximum values for 8-bit samples. Both of these options lower audio quality* (and one of the pre-processors rather obviously lowers output volume).
For best results then, it's best to record/create samples that have enough headroom built-in (as this would allow skipping of the pre-processor and HQ-modes, so no quality loss ever occurs and CPU use is limited). Either by having the overall sample being fairly quiet, or alternatively, by making sure the dynamic range of the recorded samples is fairly low and fits inside the correct maximums (i.e. compressing the samples to the correct maximum sample values).
None of the above takes away from the program working just fine, nor does it mean these methods are unusable. Far from it, in my view this type of audio mixing is not only viable but I'd actively recommended it for use in games. A few extra channels for sound effects at the cost of a single 'music' channel and a fairly low CPU overhead can make a big difference in perceived audio abilities of the system - even if the sound effects are somewhat lower quality or play back with a lower volume.
*) Strictly speaking they only limit audio quality if alterations to sample values are required to make the mix fit inside 8 bits. If this isn't needed the samples can be mixed without any alterations and hence can remain at full quality.
- Version 2.0
- Version 1.0
Tab 1
Above: the updated Audio Mixing program (version 2.0) explained and showed in action.
Tab 2
Above: the Audio Mixing program (version 1.0) explained and showed in action.
Overall, I feel this example showcases the possibilities for real-time audio mixing on entry level Amiga machines quite well (and I'm rather pleased with the overall overhead being so low, especially now with the new mixing strategy). The code can probably be improved in some places, but it works just fine as is and hopefully shows how to implement this style of mixing in Amiga games and demos.
One final thing to note: the example includes both mixers and pre-processors. It also includes unrolled mixing code for 4 channel playback. This combined results in a fairly large code size (especially for the 68000 version with its unrolled loops). For inclusion in actual projects, I'd recommend removing the code that is not required for the project and only keeping the mixing routine/number of samples to mix actually used.
I hope this is a useful example and hopefully it will inspire coders to implement more-than-four channel playback in games (or perhaps even demos). All code, apart from the startup code (by Photon of Scoopex), the Protracker replay routine (by Frank Wille) and the joystick code (found on eab.abime.net) was written by me and is (C) 2019 Jeroen Knoester.
The module I've used is a basic 4 channel module, was downloaded from The Mod Archive and is called 42k. I did not create it. All samples are sourced from the 'Weird Science Multimedia Toolkit' CD-ROM as included with Amiga Computing issue 86.
That said, please do use any part of my code or this idea you find useful. A credit/mention would be nice but is not required in any way. The program, source code and a bootable .ADF can be found in the downloads section.
If you have any questions, be sure to contact me through the contact form!