Since seeing the first 'parallax' effects way back on the Commodore 64, in games such as Turrican I & II and Flimbo's quest, I've always been fascinated by dual/multi layered screens. In case of the OCS/ECS Amiga's, the Dual Playfield mode it offered seemed to me to be a little bit too limiting, by only offering 7 foreground colours, plus 8 background colours.
With that in mind, I've been experimenting on and off with various ways to get a dual layer screen mode with more foreground colours, even if that means losing some background colours.
This time, I decided to try out using the Blitter and some quirks of the way the Amiga chipset reacts to setting the registers meant for Dual Playfield mode when the system is not actually in Dual Playfield mode to see if I couldn't make such a display work. And after I got that working, I decided to see how this compared to using hardware Sprites for a repeating pattern background layer (as many games did and indeed still do).
Dual Layer Graphics
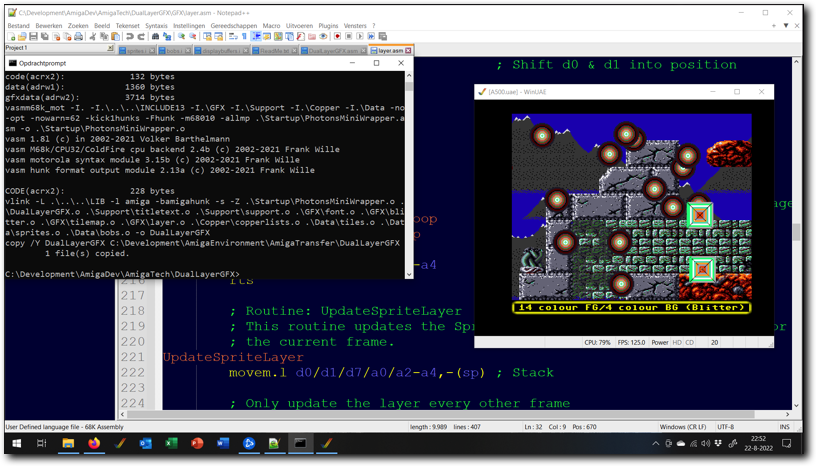
Above: testing the Dual Layer Graphics program in WinUAE.
The result is the Dual Layer Graphics example program which offers three variants of a dual layer screen mode, each with 4 background colours and 14 or 15 foreground colours. All these variants compromise in some way and they all offer relatively similar performance in terms of the number of bobs that can be drawn per frame.
The first of these effects is the standard 128 pixel wide repeating Sprite background layer. Versions of this effect were used in several games and it has been featured in the Sprite Tricks articles over at codetapper.com. It uses 4 bitplanes and offers 15 colours for the foreground and 4 colours for the background.
The second effect included is a 128 pixel wide repeating Sprite background layer that uses much less memory to achieve the effect, at a small cost in lost performance. It is otherwise identical to the standard 128 pixel wide Sprite background layer.
The third and last effect included is a Blitter based background layer, which uses 5 bitplanes, a specific palette setup and cookie-cut blitting one of the 5 bitplanes to achieve a 14 colour foreground and a 4 colour background. The background does not have to use a repeating pattern in this case and hardware Sprites are still available for other uses.
- Sprite based layers
- Blitter based layers
- Memory use, performance and notes
Tab 1
- Sprite based background layer
- Low memory use Sprite based background layer
Tab 1
The Sprite based background layer uses the Copper to horizontally reposition hardware Sprites. This is possible because the display chip Denise does not check to see if a Sprite has already been displayed on the current scanline. All it does is check to see if the Sprite's horizontal position matches the pixels that it needs to draw and if so, it displays the Sprite data. Without this Copper trick, 4 colour hardware Sprites are limited to 128 pixels horizontally per scanline.
So, when the horizontal Sprite position is updated by the Copper multiple times during each scanline, multiple copies of the Sprite will be drawn on screen at the new horizontal positions. With precise Copper timing and a Sprite as tall as the screen, it's possible to use the Amiga's 8 hardware Sprites to completely cover the screen. Couple this with the possibility to change the priority of Sprites so that they appear behind all other things on screen and this gives you the possibility of generating a background layer.
This layer will be limited to a 4 colour repeating pattern which is at most 128 pixels wide*. The Copper list used contains 224 lines of Sprite reposition instructions - one for each line of the effect.
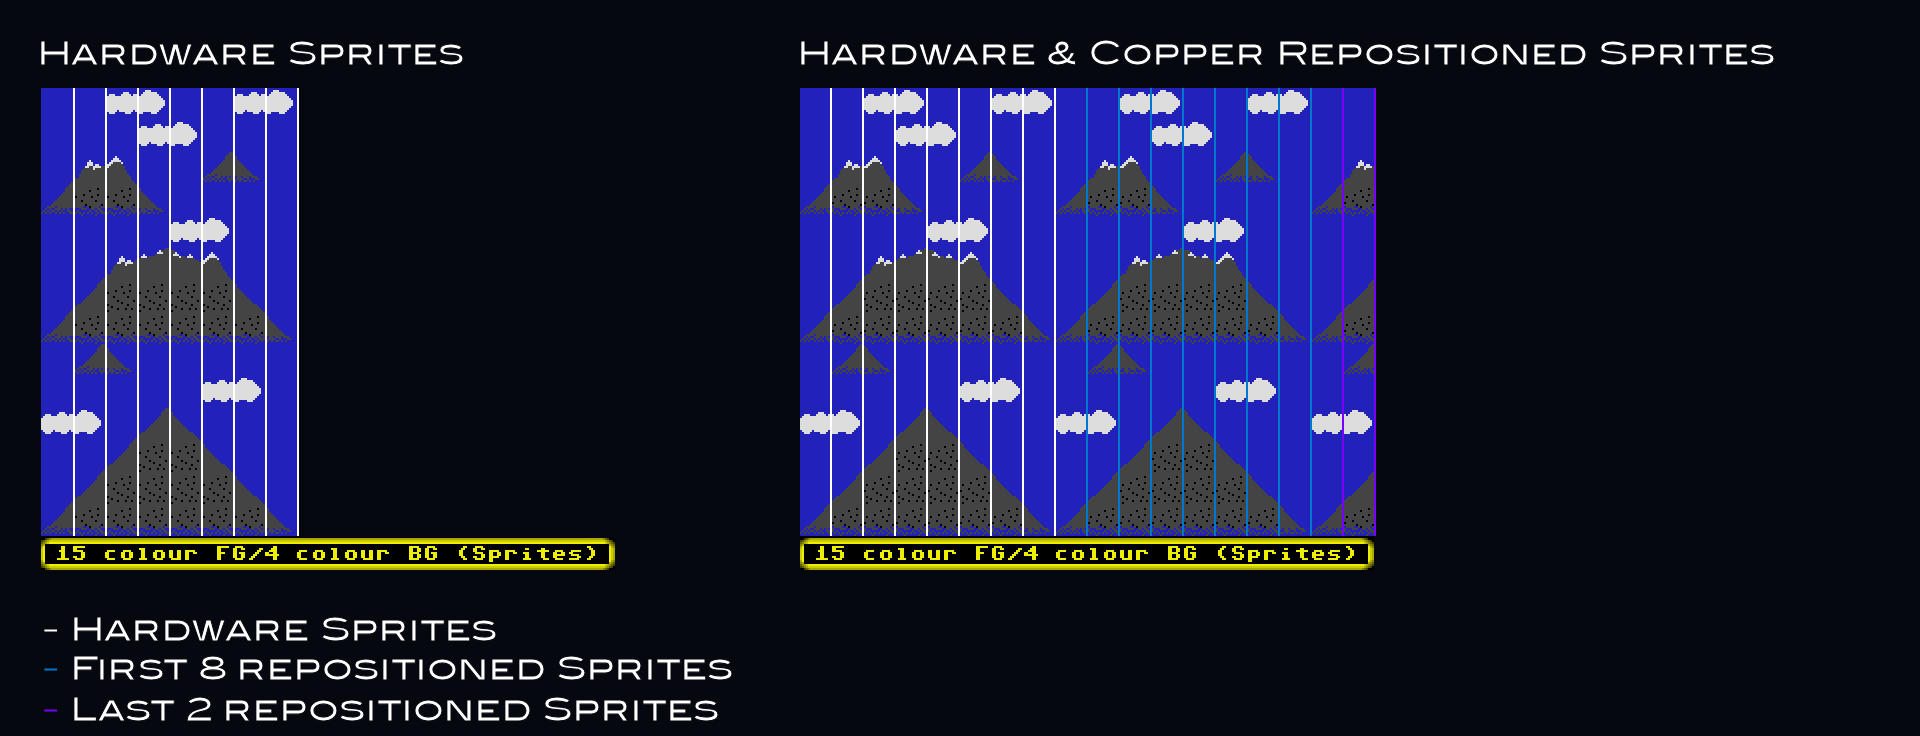
Above: Copper based Sprite repositioning
The easiest way to get such a Sprite background to scroll along with the foreground is to have 16 copies of the background pattern in memory, each shifted by an additional pixel and cycle the Sprite pointers between them as required to move the background. This does, however, cost a lot of memory. For the screen size used here (288x224), having 16 copies of the Sprite data in memory would add up to 112KB of Chip memory used for just the background layer.
A simple way to optimise this significantly is to not store 16, but rather 8 copies of the data and updating the 8 SPRxCTL registers each frame. These registers make it possible to move all the Sprites (including the ones repositioned by the Copper) by a single pixel to the right from their original position. The resulting algorithm then looks like this:
The loss of this single pixel is not very noticeable and as such, this is a useful compromise between memory use (saving 56KB of Chip memory) and visual quality.
*) with a more involved Copper list and using way more system resources it is technically possible to have a non-repeating pattern background using Sprites (as demonstrated in my Free Form Sprite layer example program), but such an effect uses so much DMA time it's not really suitable for use in games or demos.
A simple way to optimise this significantly is to not store 16, but rather 8 copies of the data and updating the 8 SPRxCTL registers each frame. These registers make it possible to move all the Sprites (including the ones repositioned by the Copper) by a single pixel to the right from their original position. The resulting algorithm then looks like this:
- Only update during even frames, skip the rest of this algorithm during odd frames
- When the frame counter can be divided by 4 (frame 0,4,8,etc), update the Sprite pointers and set the SPRxCTL values to 0 pixels offset.
- When the frame counter can't be divided by 4 (frame 2,6,10,etc), don't update the pointers and set the SPRxCTL values to 1 pixel offset to the right.
The loss of this single pixel is not very noticeable and as such, this is a useful compromise between memory use (saving 56KB of Chip memory) and visual quality.
*) with a more involved Copper list and using way more system resources it is technically possible to have a non-repeating pattern background using Sprites (as demonstrated in my Free Form Sprite layer example program), but such an effect uses so much DMA time it's not really suitable for use in games or demos.
Tab 2
The low memory use Sprite layer is similar to the standard Sprite layer (as described under the 'Method (Sprites)' tab), but it uses much less memory to implement in exchange for somewhat lower performance.
Like the standard Sprite layer, this effect allows a 4 colour, 128 pixel wide repeating pattern as the background layer. It also uses the Copper to reposition Sprites horizontally. However, instead of updating the Sprite pointers, this version of the effect updates the Sprite positions instead. As a consequence, no pre-shifted copies of the Sprite pattern are needed, saving 56KB of Chip RAM* over the standard Sprite effect.
Like the standard Sprite layer, this effect allows a 4 colour, 128 pixel wide repeating pattern as the background layer. It also uses the Copper to reposition Sprites horizontally. However, instead of updating the Sprite pointers, this version of the effect updates the Sprite positions instead. As a consequence, no pre-shifted copies of the Sprite pattern are needed, saving 56KB of Chip RAM* over the standard Sprite effect.

Above: example code of a Copper loop. The Copper 2 location will be overwritten on startup by the address of the loop point.
To further limit memory use, the Copperlist makes use of Copper loops. This means that instead of having one line of Sprite reposition instructions for every line of the effect on screen, it instead has only a few lines of such instructions**. The resulting Copperlist is much smaller - saving around 17KB of Chip RAM over the standard Sprite effect.
The reason it's possible to use loops in the Copperlist is that the display chip Denise doesn't actually care what the vertical start position of the Sprite is when displaying a Sprite. As long as the vertical start position is equal to or lower than the vertical position of the current scanline, the Sprite will be displayed all the same. The consequence of this is that the vertical start position of the Sprite never needs to change. As long as the vertical stop position is set down the screen far enough as well, this means that the same SPRxPOS value can be used for all lines of the effect.
The changes for improved memory use do come at a cost, however. The Sprite positions in the Copper list now need to be updated, which costs some time and requires one additional Sprite to be repositioned each line - which costs extra Copper DMA time. Furthermore, the Copper looping itself adds one Copper SKIP and 3 Copper MOVES to each scanline, costing extra DMA time as well.
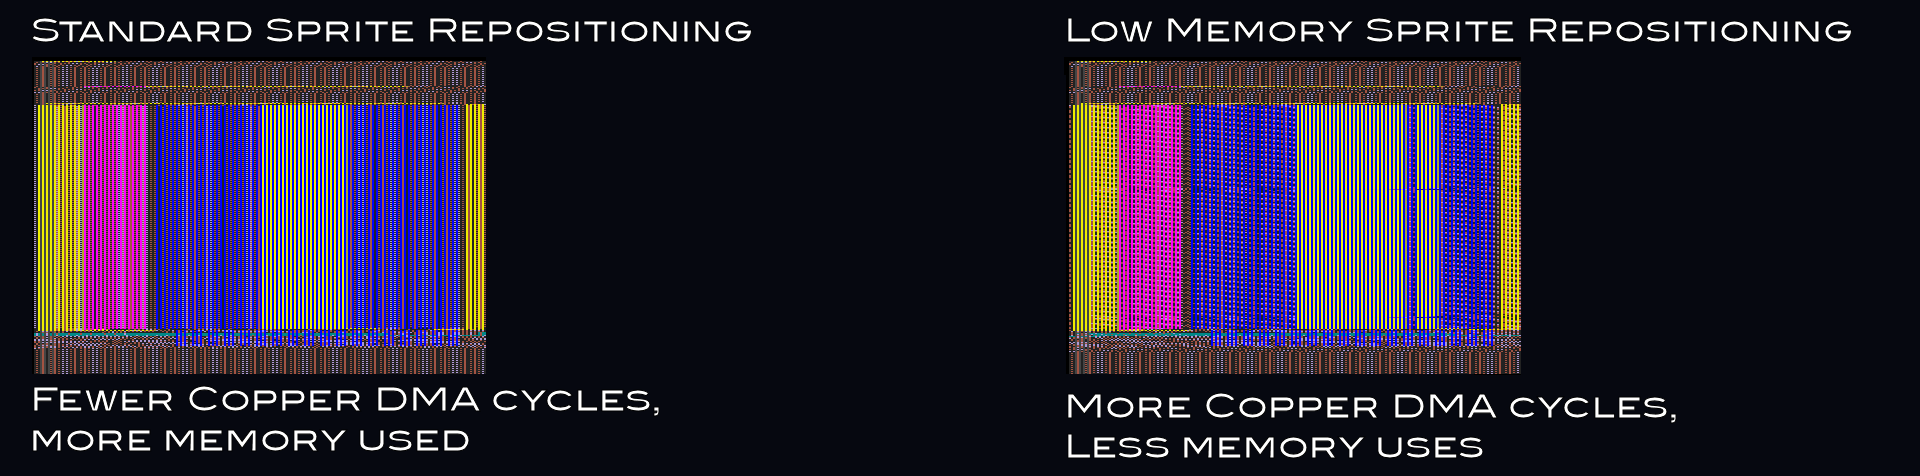
Above: the Low Memory use Sprite background uses more Copper instructions (and thus DMA cycles) to achieve its result.
As a result of this, the standard Sprite layer manages to draw one more 32x32 bob per frame than the low memory use Sprite layer manages. Still, if memory is at a premium, the extra memory available may make this a worthwhile alternative.
*) It saves 56KB over the effect as described in the article. The real amount of memory saved both depends on the width of the pattern and whether 8 or 16 pre-shifted copies of the Sprite data are being used.
**) Due to the way Copper WAIT/SKIP instructions work when only testing for a horizontal position, it's not possible to use only one line of reposition instructions.
Tab 2
- Blitter based background layer
- Blitter Objects and the Blitter based background layer
Tab 1
The Blitter based background layer makes use of a quirk in the Amiga chipset to allow for a 14 colour foreground layer and a 4 colour background layer. This effect also supports the use of hardware Sprites, though these will have to share colours with the foreground and are further limited to having 8 colours to choose from.
The chipset already supports a two layer screenmode, called Dual Playfield mode. This allows an OCS/ECS Amiga to display a two layer screen with up to 7 foreground and 8 background colours. To support this mode, various chipset registers have separate settings per playfield and a number of chipset registers is playfield specific.
However, these settings and registers are fully usable even when the Dual Playfield mode is not enabled. The only difference is how the graphics chip, Denise, interprets the resulting bitplane data. When Dual Playfield mode is enabled, the chip separates the two layers such that each layer has it's own palette colours assigned (0-7 for playfield one and 8-15 for playfield two, assuming 6 bitplanes are active). When Dual Playfield mode is not enabled, this separation does not happen.
Instead, after applying display shifts, pointer values, etc, the colour index value is determined by the pixel value of each of the overlapping and per-playfield shifted bitplanes. Normally this generates a corrupted display as the now incorrectly shifted bitplanes no longer add up to the desired colour index, so for non-Dual Playfield mode screens the shifts are supposed to be set the same.
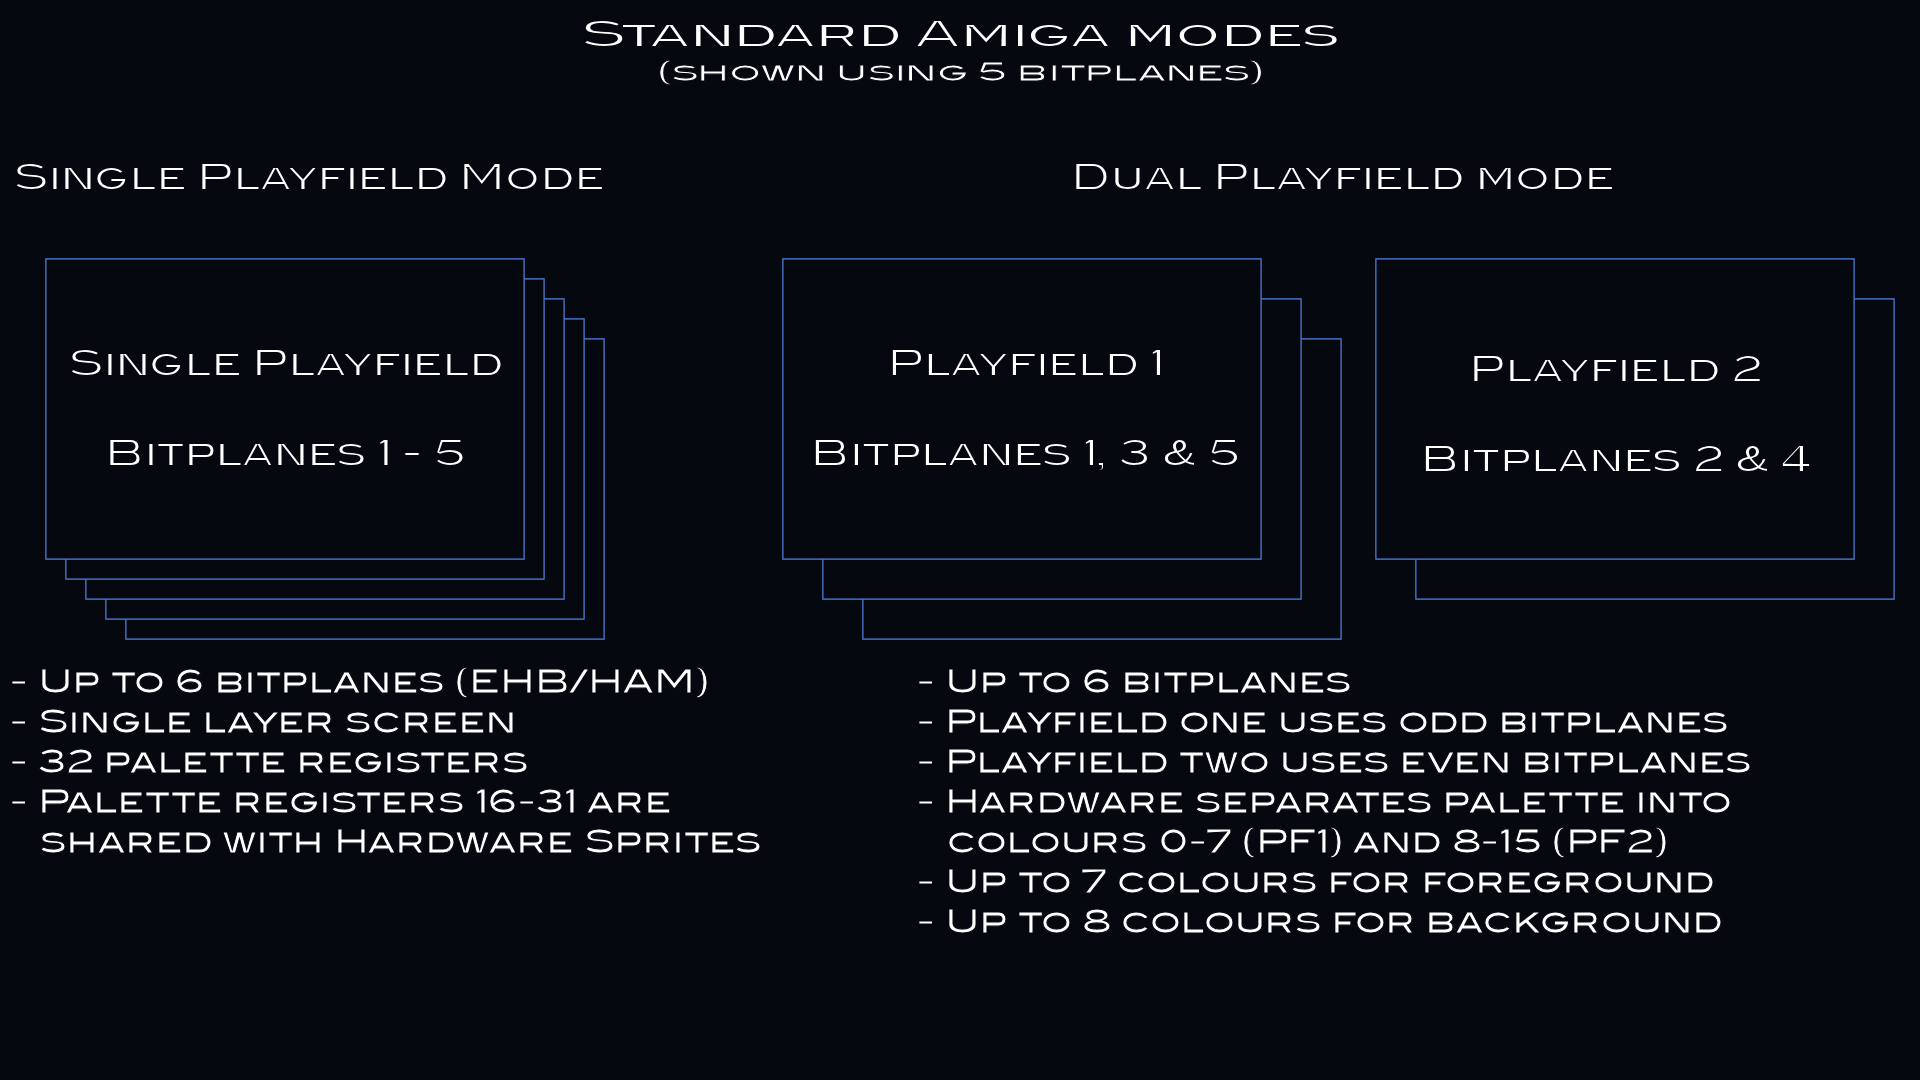
Above: standard Amiga screen modes include Single- and Dual Playfield modes
However, by setting up a palette that assumes this kind of shifting can happen, it's possible to emulate Dual Playfield mode without ever activating it. To do this, we need to look up which bitplane belongs to which playfield, determine which playfield should be the top layer. Then, generate a table of colours where any colour index that includes both data set in bitplanes that are part of the top playfield and data set in bitplanes that belong to the bottom playfield are set the same colour as bitplanes that are only part of the top playfield.
Since the Amiga only has 32 colours, this table will be limited to 32 entries*. Furthermore, the playfield hardware can only split the display into two layers, one consisting of the odd bitplanes (bitplanes 1, 3 & 5) and one consisting of the even bitplanes (bitplanes 2 & 4) so the foreground/background split has to be kept along those lines.
Such a table will look something like this:
show
show
show
show
show
show
show
show
show
show
show
show
show
show
show
show
show
show
show
show
show
show
show
show
show
show
show
show
show
show
show
show
show
Index
Bitplane 5
Bitplane 4
Bitplane 3
Bitplane 2
Bitplane 1
Colour
0
0
0
0
0
0
Background 0
1
0
0
0
0
1
Foreground 0
2
0
0
0
1
0
Background 1
3
0
0
0
1
1
Foreground 0 (duplicate)
4
0
0
1
0
0
Foreground 1
5
0
0
1
0
1
Foreground 2
6
0
0
1
1
0
Foreground 1 (duplicate)
7
0
0
1
1
1
Foreground 2 (duplicate)
8
0
1
0
0
0
Background 2
9
0
1
0
0
1
Foreground 0 (duplicate)
10
0
1
0
1
0
Background 3
11
0
1
0
1
1
Foreground 0 (duplicate)
12
0
1
1
0
0
Foreground 1 (duplicate)
13
0
1
1
0
1
Foreground 2 (duplicate)
14
0
1
1
1
0
Foreground 1 (duplicate)
15
0
1
1
1
1
Foreground 2 (duplicate)
16
1
0
0
0
0
Foreground 4
17
1
0
0
0
1
Foreground 5
18
1
0
0
1
0
Foreground 4 (duplicate)
19
1
0
0
1
1
Foreground 5 (duplicate)
20
1
0
1
0
0
Foreground 6
21
1
0
1
0
1
Foreground 7
22
1
0
1
1
0
Foreground 6 (duplicate)
23
1
0
1
1
1
Foreground 7 (duplicate)
24
1
1
0
0
0
Foreground 4 (duplicate)
25
1
1
0
0
1
Foreground 5 (duplicate)
26
1
1
0
1
0
Foreground 4 (duplicate)
27
1
1
0
1
1
Foreground 5 (duplicate)
28
1
1
1
0
0
Foreground 6 (duplicate)
29
1
1
1
0
1
Foreground 7 (duplicate)
30
1
1
1
1
0
Foreground 6 (duplicate)
31
1
1
1
1
1
Foreground 7 (duplicate)
As can be seen from the table above, this leads to 7 unique foreground colours and 4 unique background colours, which is identical to the number of colours that can be shown on a 5 bitplane Dual Playfield mode screen - proving that the same resulting screen can be created without using Dual Playfield mode itself, albeit using a more complicated palette set up and by giving up separate Sprite colours - these are now all filled with duplicates of various foreground colours.
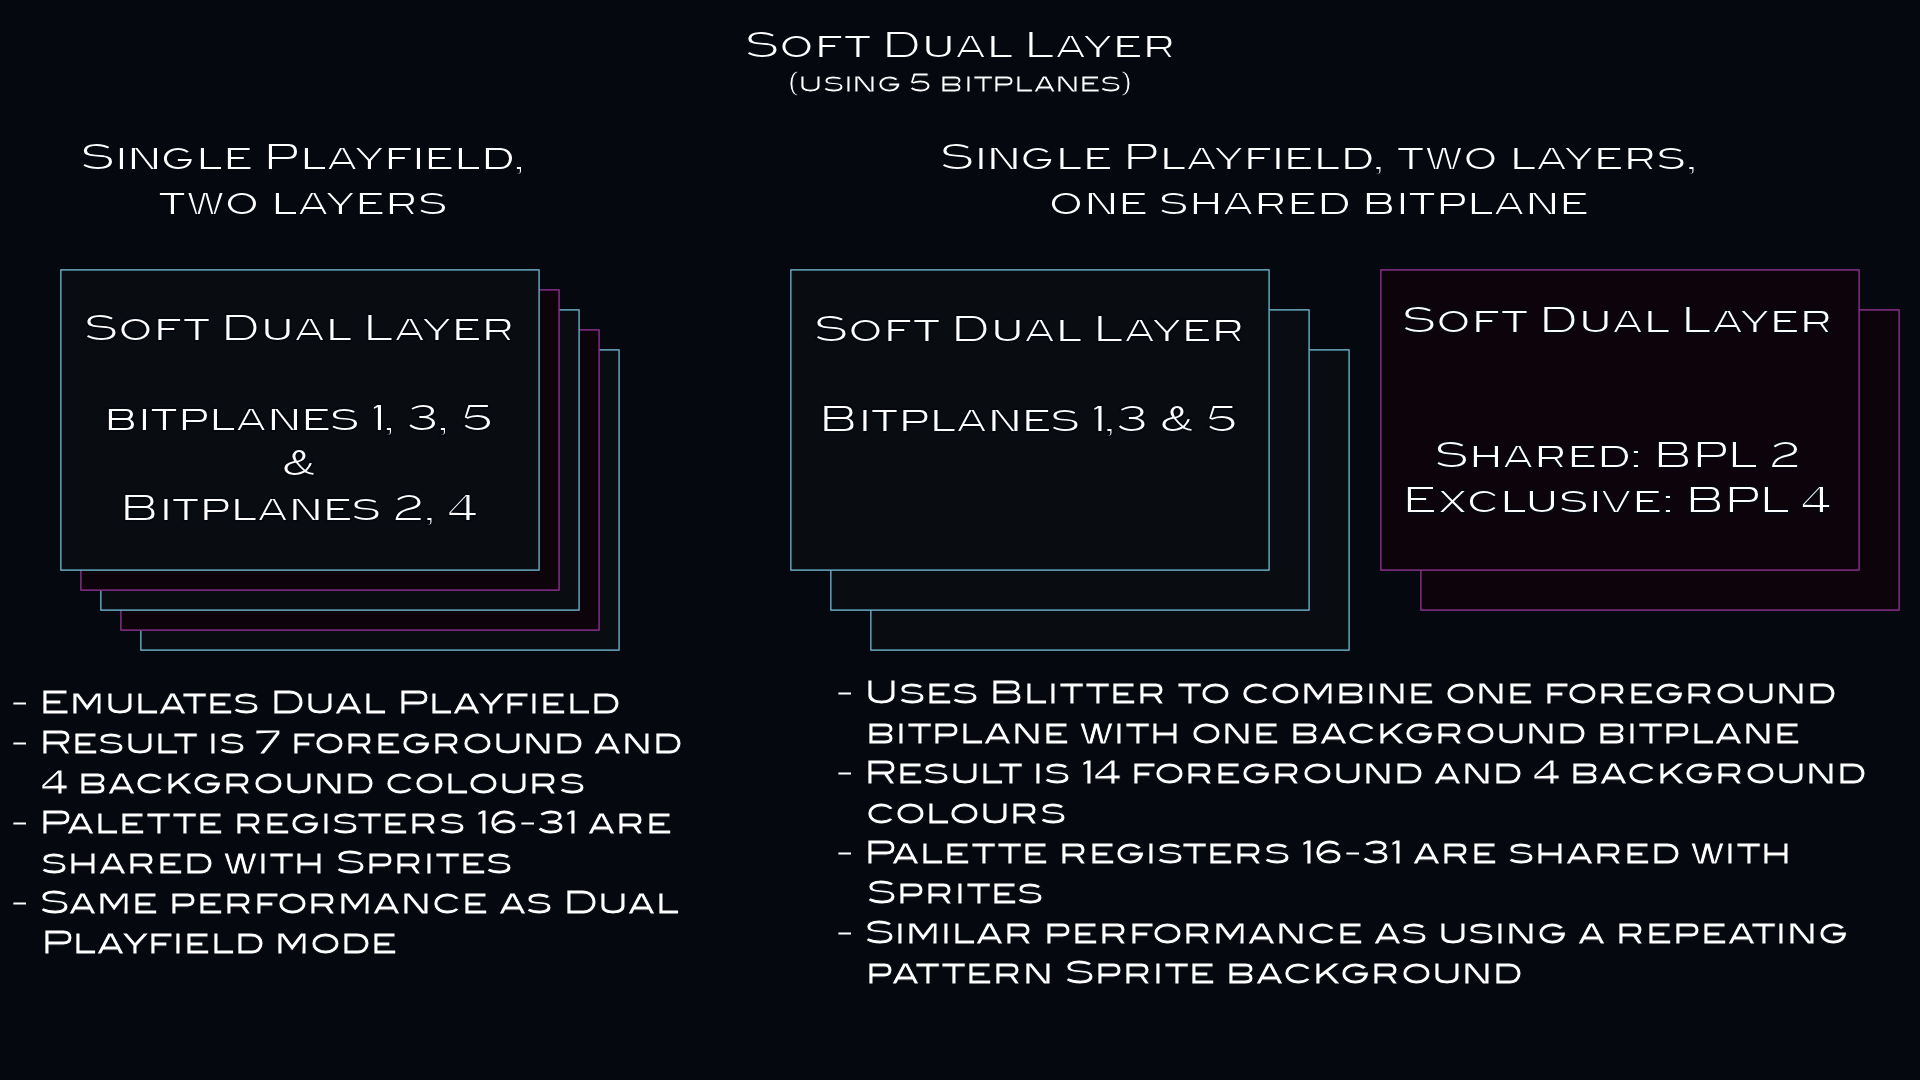
Above: using the Blitter and registers meant for Dual Playfield mode, the Single Playfield mode can be converted into a Soft Dual Layer mode with 14 foreground and 4 background colours.
For clarity, this means each of these two playfields can also be scrolled individually without causing colour artifacts, even though Dual Playfield mode is not active.
The second piece of the puzzle for generating a 14 colour foreground/4 colour background screen is the Blitter. It's possible to use the Blitter to generate a single bitplane bitmap that is a combination of a single foreground bitplane and a single background bitplane. This is done by using a mask to know which pixels need to be set to show the foreground and which need to be set to the background. Combine this with setting the Blitter shift registers such that the foreground is moved somewhat compared to the background allows the two layers to scroll independently on top of one another.
The second piece of the puzzle for generating a 14 colour foreground/4 colour background screen is the Blitter. It's possible to use the Blitter to generate a single bitplane bitmap that is a combination of a single foreground bitplane and a single background bitplane. This is done by using a mask to know which pixels need to be set to show the foreground and which need to be set to the background. Combine this with setting the Blitter shift registers such that the foreground is moved somewhat compared to the background allows the two layers to scroll independently on top of one another.
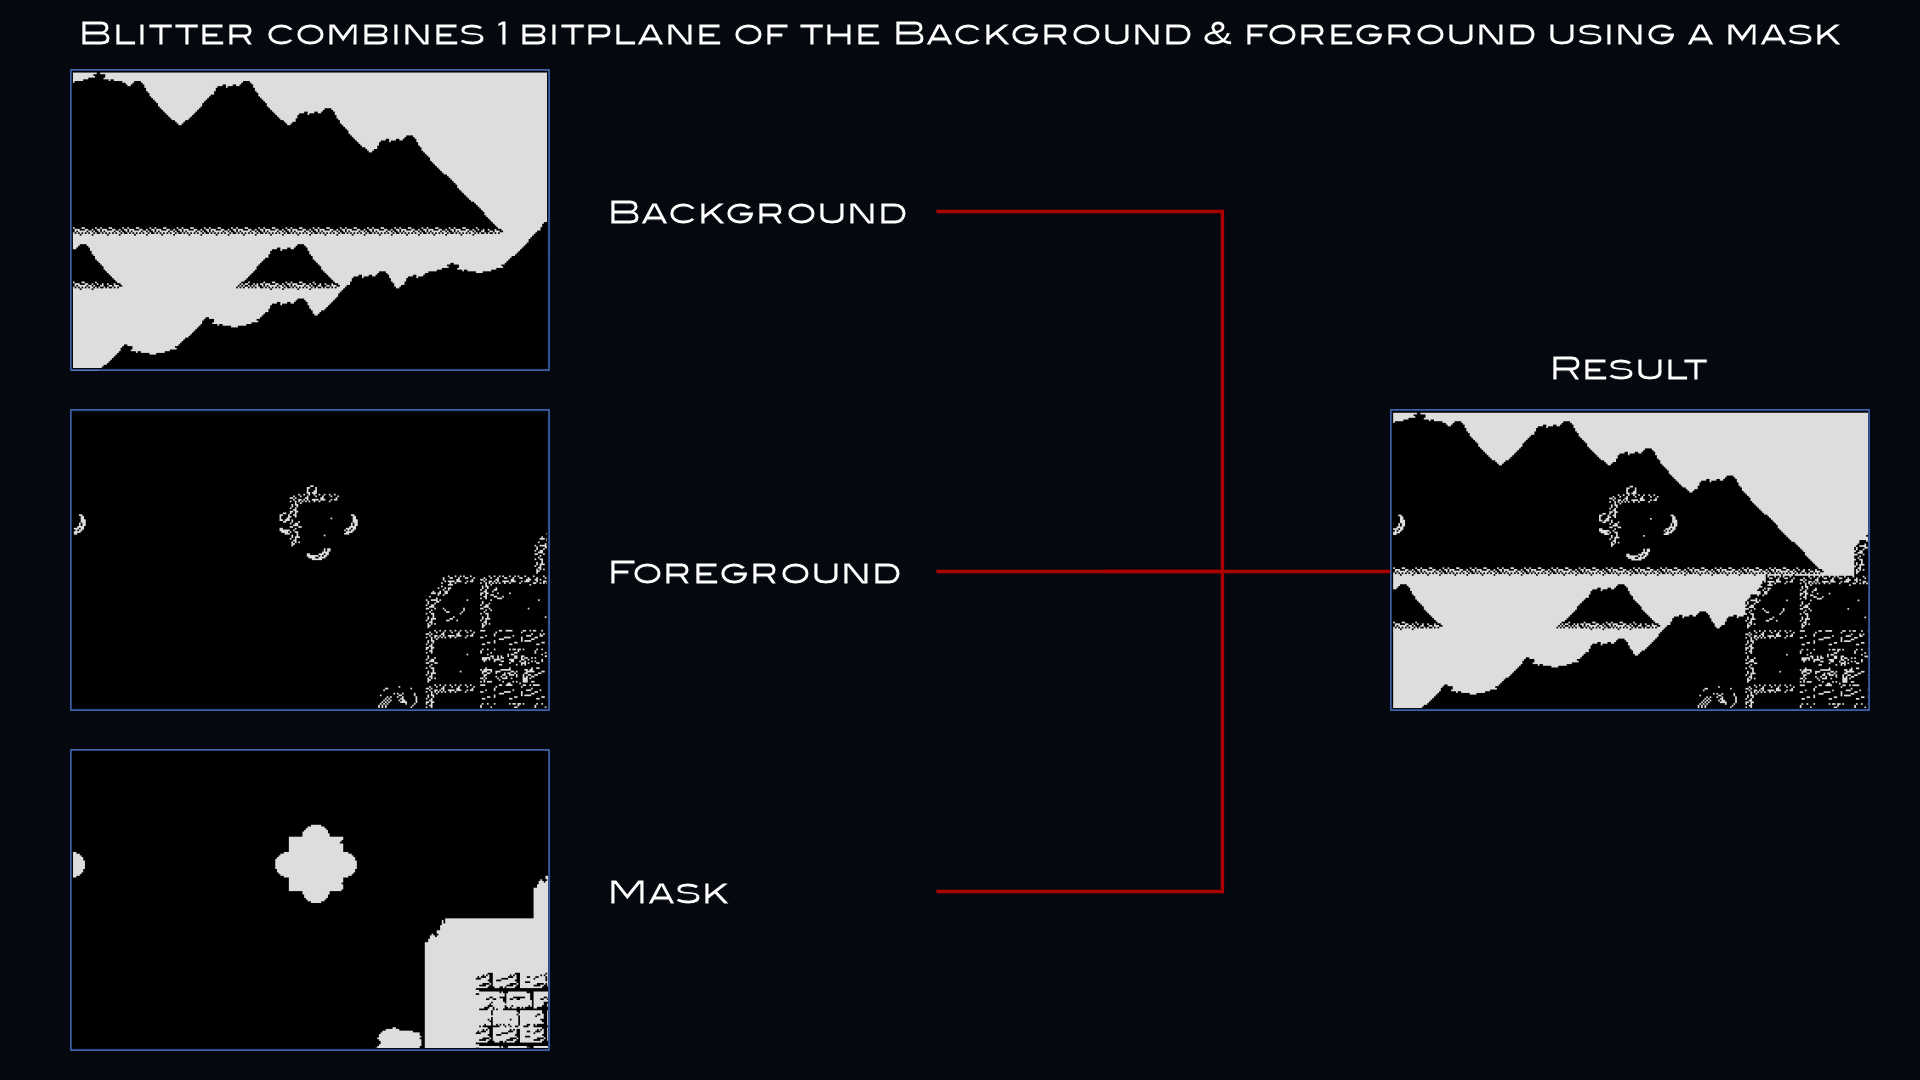
Above: using cookie-cut mode, the Blitter can combine a foreground, background and mask bitplane into a single bitplane sharing part of the foreground and background.
Because of the way the foreground is drawn on to this single bitplane, this combination bitplane can essentially treated as the 4th foreground bitplane. Because of the bitplane combinations that can be made this way, one of the resulting colours must either be assigned to the foreground or background. The example assigns the colour to the background, giving a 14 colour foreground and a 4 colour background. Alternatively, it's also possible to assign this colour to the foreground, which would give a 15 colour foreground and a 3 colour background.
The resulting palette after taking all the above into account looks like this:
The resulting palette after taking all the above into account looks like this:
show
show
show
show
show
show
show
show
show
show
show
show
show
show
show
show
show
show
show
show
show
show
show
show
show
show
show
show
show
show
show
show
show
Index
Bitplane 5
Bitplane 4
Bitplane 3
Bitplane 2
Bitplane 1
Colour
0
0
0
0
0
0
Background 0
1
0
0
0
0
1
Foreground 0
2
0
0
0
1
0
Background 1
3
0
0
0
1
1
Foreground 1
4
0
0
1
0
0
Foreground 2
5
0
0
1
0
1
Foreground 3
6
0
0
1
1
0
Foreground 4
7
0
0
1
1
1
Foreground 5
8
0
1
0
0
0
Background 2
9
0
1
0
0
1
Foreground 0 (duplicate)
10
0
1
0
1
0
Background 3
11
0
1
0
1
1
Foreground 1 (duplicate)
12
0
1
1
0
0
Foreground 2 (duplicate)
13
0
1
1
0
1
Foreground 3 (duplicate)
14
0
1
1
1
0
Foreground 4 (duplicate)
15
0
1
1
1
1
Foreground 5 (duplicate)
16
1
0
0
0
0
Foreground 6
17
1
0
0
0
1
Foreground 7
18
1
0
0
1
0
Foreground 8
19
1
0
0
1
1
Foreground 9
20
1
0
1
0
0
Foreground 10
21
1
0
1
0
1
Foreground 11
22
1
0
1
1
0
Foreground 12
23
1
0
1
1
1
Foreground 13
24
1
1
0
0
0
Foreground 6 (duplicate)
25
1
1
0
0
1
Foreground 7 (duplicate)
26
1
1
0
1
0
Foreground 8 (duplicate)
27
1
1
0
1
1
Foreground 9 (duplicate)
28
1
1
1
0
0
Foreground 10 (duplicate)
29
1
1
1
0
1
Foreground 11 (duplicate)
30
1
1
1
1
0
Foreground 12 (duplicate)
31
1
1
1
1
1
Foreground 13 (duplicate)
As can be seen in the palette above, the foreground gets 14 colours. The background gets 4 colours and the hardware Sprites are limited to 8 unique colours. These 8 colours are shared with the foreground. Other than this limitation, all Sprite channels are freely available for use on screen.

Above: the resulting display shows a 14 colour foreground and a 4 colour background.
One problem with using the Blitter to cookie-cut a full bitplane every frame is that this takes a lot of DMA cycles to achieve. However, this cost can be lowered significantly by observing that in almost all Dual Layer effects the foreground moves faster than the background. By making a compromise and forcing the relative speed of the foreground to be twice as fast as the background**, the work per frame can be halved. This does mean using a double buffer for the bitplane generated by the Blitter, but the performance gain makes this a worthwile use of memory.
*) For the purposes of this example, Extra Half Brite mode will be ignored as an option.
**) To keep scrolling smooth, the FG speed should be either 1 or a multiple of 2. Other FG speeds will cause a visible judder/jitter in the Blitter generated background bitplane due to the 25FPS update of the background.
It should also be noted that though this has not been tested in the example, it is probably possible to have the background move between the full foreground speed and 1/2 of the foreground speed without causing smoothness issues, as long as the FG speed is either 1 or a multiple of 2.
Tab 2
Drawing bobs onto a screen using the Blitter based background layer is somewhat more involved than drawing them onto a regular screen. This is because bobs need to draw both to the 3 bitplanes that form the foreground, but also to the 4th bitplane that is shared between the foreground and the background. If this was not done, the bobs would only have 7 colours and show colour artefacts as they move around the screen*.
To correctly draw onto both the foreground bitplanes and the shared bitplane, the differences in scroll offset in words and scroll shift in pixels need to be taken into account. These differences exist because both the foreground and the background move at different speeds.
To correctly draw onto both the foreground bitplanes and the shared bitplane, the differences in scroll offset in words and scroll shift in pixels need to be taken into account. These differences exist because both the foreground and the background move at different speeds.

Above: objects are split into two bobs, one covering three bitplanes and one covering a single bitplane.
On top of that, the shared bitplane is updated at only 25FPS, which means that the normal way of double buffered blitting can't be used - the blits to the shared bitplane must be done to the same buffer as the one that is currently being shown. This in turn means that attention must be paid to avoiding screen tearing and other graphics glitches that can result when blitting to a buffer that is being shown on screen.
In order to make blitting bobs to the two layers easier, the 3 foreground bitplanes are set up in memory as an interleaved bitmap and the 2 background bitplanes are set up in memory as two separate non-interleaved bitmaps (one of which is the shared FG/BG one).
All this ultimately means that two blits are needed for both the cookie-cut and restore phases of blitting bobs: one to the foreground bitmap and one to the shared bitmap. These blits need to keep the differences in offsets and shifts into account and thus require their own coordinate conversion. Furthermore, the blits to the shared bitmap need to be done outside of the bitplane fetch area of the frame to avoid screen tearing.
However, there is a catch. The blits to the foreground bitmap are done in the normal, double buffered, method. The blits to the shared bitmap are done in a single buffered way. This means that the results of the blits to the shared bitmap will be shown a frame earlier than the blits to the foreground bitmap and that the blitting routine can't rely on a pristine buffer to use when restoring.
To solve the issue with restoring, the 1 bitplane blits copy the background area they occupy to a small buffer in Chip RAM prior to drawing them and when restoring, copy the background back to the bitmap they originated from. Because the shared bitmap is replaced every other frame, an optimisation is possible here. Instead of copying to the restore buffer every frame and restoring from the restore buffer every frame, the code skips restoring on the frame the shared bitmap gets swapped and can therefore also skip copying to the restore buffer the prior frame, as shown in the table below:
show
show
show
show
show
show
show
show
Frame
Shared bitmap used
Copy to restore buffer
Copy from restore buffer
0
#1
yes
no
1
#1
no
yes
2
#2
yes
no
3
#2
no
yes
4
#1
yes
no
5
#1
no
yes
(etc)
(etc)
(etc)
(etc)
To fix the problem where the single buffered blits are one frame ahead, the program simply draws them one frame later to remain in sync with the double buffered blits.
Single buffering caveats
Normally, blitting is done in a dual buffered environment to prevent screen tearing or disappearing objects on the screen. However, the single buffered blits only affect a single bitplane. This means the blits to the shared bitmap can be done in a small amount of time. Given that the bobs are 4 bitplanes deep, the 1 bitplane portion then takes 25% of the total blitter time**.
Taking into account the time spent by bitplane DMA for the 5 bitplane screen as used by the example however, the scanlines available below the visible display (used for the vertical blank etc) represent closer to 40% of the total free cycles for the Blitter***. This means that there's more than enough space during the vertical blank to deal with the 1 bitplane blits and so screen tearing is avoided.
It's worth pointing out that combining this effect as programmed here with mod/protracker player routines might cause some issues in regards to screen tearing depending on the CPU use of the routines used and whether or not CIA timing is used. Should such issues crop up, they can most likely be fixed by either decreasing the vertical size of the screen somewhat to compensate.
Other options to fix such issues include making sure the Protracker player can't cause interrupts during the rasterline block used for blitting the 1 bitplane parts, sorting the objects in Y order so that the top ones are drawn first, using the Copper to set up the 1 bitplane blits instead, forcing the playback routine(s) to be called once per frame (after the 1 bitplane blits are done) instead of using CIA timers, choosing a faster replay routine, reducing the vertical size of the screen somewhat to compensate for the time the playback routines take or reducing the number of objects drawn.
*) This might actually be useful for some interesting effects, but those are outside of the scope of this example.
**) This is just counting the time spent by the Blitter, the overhead for setting up blits also needs to be added and means the real world time spent is more than 25%.
***) The exact quantity depends on the size of the display. The example uses a 288*224*5 main screen and a 16 pixel tall static panel below that. If a 320*256*5 main screen is used, the vertical blank represents around 29% of the total raster time, which should still be enough to draw the 1 bitplane objects.
Tab 3
- Memory use
- Performance
- Notes
Tab 1
The example program provided allocates all memory required to run all three of the effects at the same time. This can make it harder to pin-point exactly how much memory the different variant cost. With that in mind, what follows is a description of the memory use of each of the effects and (where applicable), potential optimisations to memory use. Note that any memory optimisations mentioned assume keeping the size of the effect (full screen background layer) the same.
General points
All effects run on a 288x224 (visible) / 304x224 (fetched) display in either 4 or 5 bitplanes, with a 288x16 pixel panel in 3 bitplanes below them. For optimal speed, all effects (where possible) use a blitting strategy involving a double buffered screen, plus a third buffer that only contains an unaltered copy of the non-Bob/non-Sprite graphics. This third buffer is used as the source for restore blits. To improve memory use for scrolling, the example uses cork-screw scrolling for all three variants of the effect, reserving enough memory to scroll 50 screens (which is equal to the cost of 50 extra lines per bitplane allocated).
To simplify development, the example allocates all graphics buffers to the size needed for the effect that needs the most memory. This means (far) more memory is allocated than is needed by the individual effects. Likewise, the example contains display options that require an empty bitplane exists. This is an extra bitplane allocated on top of the normally required. It also keeps all Sprite and object data in memory as needed for all variants of the effect, which further increases memory use.
As a result, the example requires around 420KB of free Chip RAM. However, keep in mind the actual memory use for each of the effects is far lower.
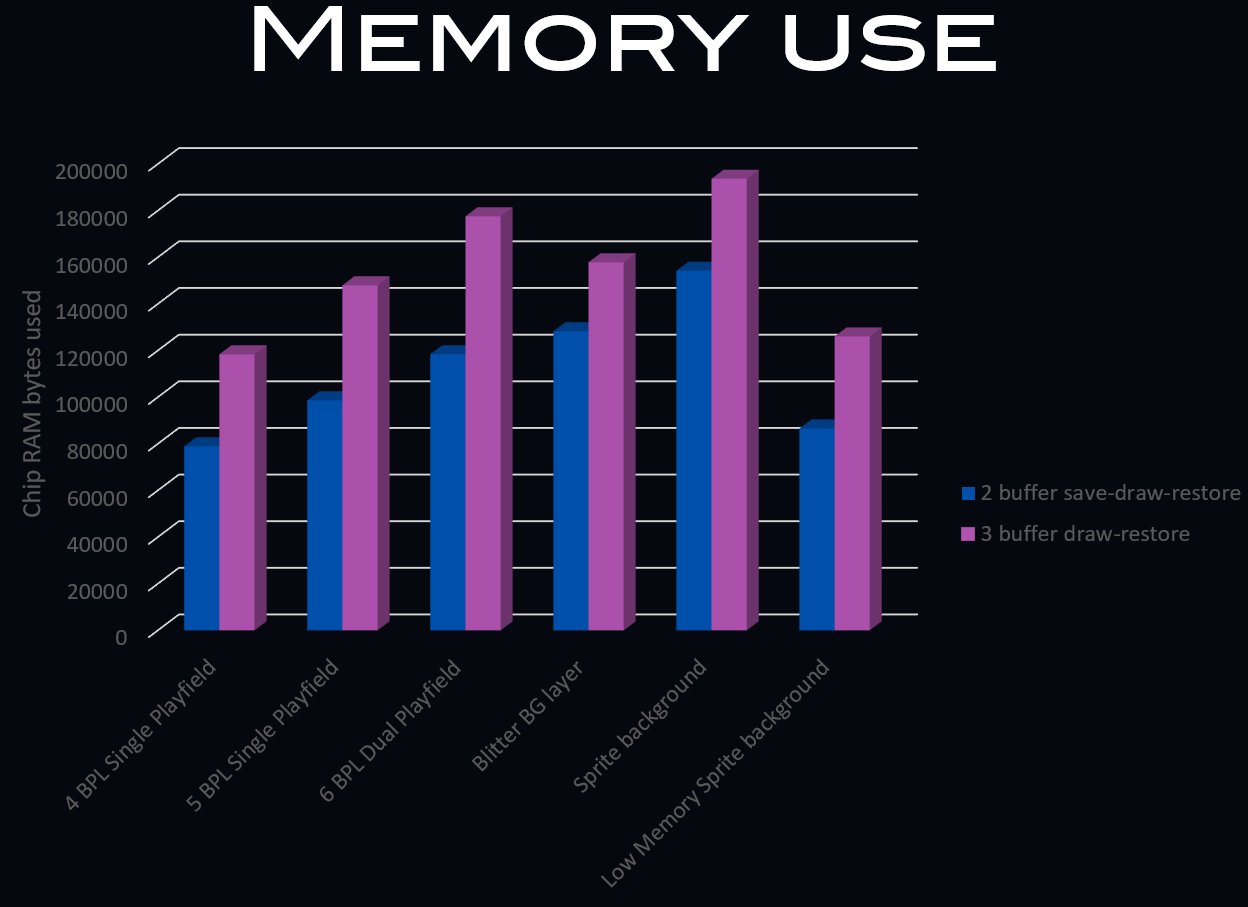
Above: a graph comparing memory use between the three effects and various standard screen modes (all assume 304x224 screen size, plus room for scrolling & bob space around the edges)
Blitter based background
The Blitter based background effect runs in 5 bitplanes, split across a three bitplane foreground and a 2 bitplane background (with one bitplane being shared with the foreground). It uses a double buffered setup for both the foreground and background and additionally uses a third buffer for the foreground to improve the speed of restore blits.
In addition, it needs several extra bitplanes allocated for the cookie-cut effect: one for the foreground source tiles, one for the foreground source tiles mask and one for the background source tiles. In total, the bitplane based background as shown here requires 3*3 bitplanes for the foreground, 2*2 bitplanes for the background and 3 more bitplanes to be able to generate the shared background bitplane.
There are a few ways to optimise memory use. The first would be to use the tilemap as the source for restore blits, or to opt for a save-draw-restore method of blitting rather than a draw-restore method. Of these, especially the latter option will reduce performance. The second way to optimise memory use would be to make the 2nd background bitplane (the non-shared one) single buffered instead of double buffered. This would make background animation harder to do without glitches, but would save memory.
The following table shows the memory use of several standard display/bob drawing setups of the same size as used in the example. It also shows the memory use of the Blitter based background as used in the example, plus the memory use of the optimisations described above.
show
show
show
show
show
show
show
show
show
Screen setup
Bitplanes active
Bitplanes allocated
Chip Memory used*
Single layer 4 bitplanes, save-draw-restore
4
8
78912 bytes
Single layer 4 bitplanes, draw-restore
4
12
118368 bytes
Single layer 5 bitplanes, save-draw-restore
5
10
98640 bytes
Single layer 5 bitplanes, draw-restore
5
15
147960 bytes
Dual Playfield 6 bitplanes, save-draw-restore
6
12
118368 bytes
Dual Playfield 6 bitplanes, draw-restore
6
18
177552 bytes
Blitter background, save-draw-restore
5
13
128232 bytes
Blitter background, draw-restore
5
16
157824 bytes
All memory sizes listed assume a 288x224 visible display / 304x224 fetched display as described in the General section and do not include memory for objects to draw nor the 16 line, 3 bitplane panel at the bottom of the screen.
*) Based on the number of bitplanes allocated as main display buffers. When using one of the save-draw-restore methods, some extra memory needs to be allocated as temporary buffers for saving the parts of the background that need to be restored later.
Sprite based background
The Sprite based background runs in 4 bitplanes and adds a repeating Sprite background using the Copper. It uses a double buffered setup for the foreground uses a third buffer for the foreground to improve the speed of restore blits.
In addition it requires memory to store the Sprite background layer and uses pre-shifted Sprite data to improve performance, which requires 7 more copies of the Sprite background layer data. In total, the Sprite based background requires 3*4 bitplanes for the foreground, a Copper list with 224 lines repositioning the Sprites, and 8*128*224 Sprite pixels of Sprite data.
To decrease memory use (apart from the way used for the low memory Sprite background), the restoring of bobs could use the tilemap as its the source, or alternatively it's possible to opt for a save-draw-restore method of blitting rather than a draw-restore method. Of these, especially the latter option will reduce performance.
The following table shows the memory use of several standard display/bob drawing setups of the same size as used in the example. It also shows the memory use of the Sprite based background as used in the example, plus the memory use of the optimisation described above.
show
show
show
show
show
show
show
show
show
Screen setup
Bitplanes active
Bitplanes allocated
Sprite/Copper allocated
Chip memory used*
Single layer 4 bitplanes, save-draw-restore
4
8
N/A
78912 bytes
Single layer 4 bitplanes, draw-restore
4
12
N/A
118368 bytes
Single layer 5 bitplanes, save-draw-restore
5
10
N/A
98640 bytes
Single layer 5 bitplanes, draw-restore
5
15
N/A
147960 bytes
Dual Playfield 6 bitplanes, save-draw-restore
6
12
N/A
118368 bytes
Dual Playfield 6 bitplanes, draw-restore
6
18
N/A
177552 bytes
Sprite background, save-draw-restore
4
8
75276 bytes
154188 bytes
Sprite background, draw-restore
4
12
75276 bytes
193644 bytes
*) Based on the number of bitplanes allocated as main display buffers. When using one of the save-draw-restore methods, some extra memory needs to be allocated as temporary buffers for saving the parts of the background that need to be restored later.
All memory sizes listed assume a 288x224 visible display / 304x224 fetched display as described in the General section and do not include memory for objects to draw nor the 16 line, 3 bitplane panel at the bottom of the screen.
Low Memory use Sprite based background
The Low Memory use Sprite based background runs in 4 bitplanes and adds a repeating Sprite background using the Copper. It uses a double buffered setup for the foreground uses a third buffer for the foreground to improve the speed of restore blits.
In addition it requires memory to store the Sprite background layer. In total, the Sprite based background requires 3*4 bitplanes for the foreground, a Copper list with Copper loops for repositioning the Sprites, and 128*224 Sprite pixels of Sprite data.
To decrease memory use (apart from the way used for the low memory Sprite background), the restoring of bobs could use the tilemap as its the source, or alternatively it's possible to opt for a save-draw-restore method of blitting rather than a draw-restore method. Of these, especially the latter option will reduce performance.
The following table shows the memory use of several standard display/bob drawing setups of the same size as used in the example. It also shows the memory use of the Low Memory use Sprite based background as used in the example, plus the memory use of the optimisation described above.
show
show
show
show
show
show
show
show
show
Screen setup
Bitplanes active
Bitplanes allocated
Sprite/Copper allocated
Chip memory used*
Single layer 4 bitplanes, save-draw-restore
4
8
N/A
78912 bytes
Single layer 4 bitplanes, draw-restore
4
12
N/A
118368 bytes
Single layer 5 bitplanes, save-draw-restore
5
10
N/A
98640 bytes
Single layer 5 bitplanes, draw-restore
5
15
N/A
147960 bytes
Dual Playfield 6 bitplanes, save-draw-restore
6
12
N/A
118368 bytes
Dual Playfield 6 bitplanes, draw-restore
6
18
N/A
177552 bytes
Low Memory Sprite background, save-draw-restore
4
8
7652 bytes
86564 bytes
Low Memory Sprite background, draw-restore
4
12
7652 bytes
126020 bytes
*) Based on the number of bitplanes allocated as main display buffers. When using one of the save-draw-restore methods, some extra memory needs to be allocated as temporary buffers for saving the parts of the background that need to be restored later.
All memory sizes listed assume a 288x224 visible display / 304x224 fetched display as described in the General section and do not include memory for objects to draw nor the 16 line, 3 bitplane panel at the bottom of the screen.
All memory sizes listed assume a 288x224 visible display / 304x224 fetched display as described in the General section and do not include memory for objects to draw nor the 16 line, 3 bitplane panel at the bottom of the screen.
Tab 2
In order to achieve the performance as seen, several optimisations had to be done to the blitting code used. In particular for the Blitter based background layer, the extra blits done by splitting the bobs into a 3 bitplane and a 1 bitplane part had a notable effect on the number of objects that could be drawn using 'standard' blitting code.
In the interest of not overstating the performance of the Blitter based backgrounds, these optimisations have been kept in place for the Sprite based backgrounds as well.
Some of the optimisations performed include:
In the interest of not overstating the performance of the Blitter based backgrounds, these optimisations have been kept in place for the Sprite based backgrounds as well.
Some of the optimisations performed include:
- Preset as many Blitter registers as possible
- Loop over all blits of a given type (restore, cookiecut, etc) in one routine rather than calling a separate per-blit routine
- Optimise register use during loops so that as few registers have to be reloaded as possible
- Use PC relative or register relative addressing where possible
show
show
show
show
Effect
Bobs per frame
Sprites per frame
Blitter based background
13
2 objects @32x32*
Sprite based background
14
N/A
Low Memory Sprite based background
13
N/A
*) These are made using attached Sprites and are using all 8 Sprite channels.
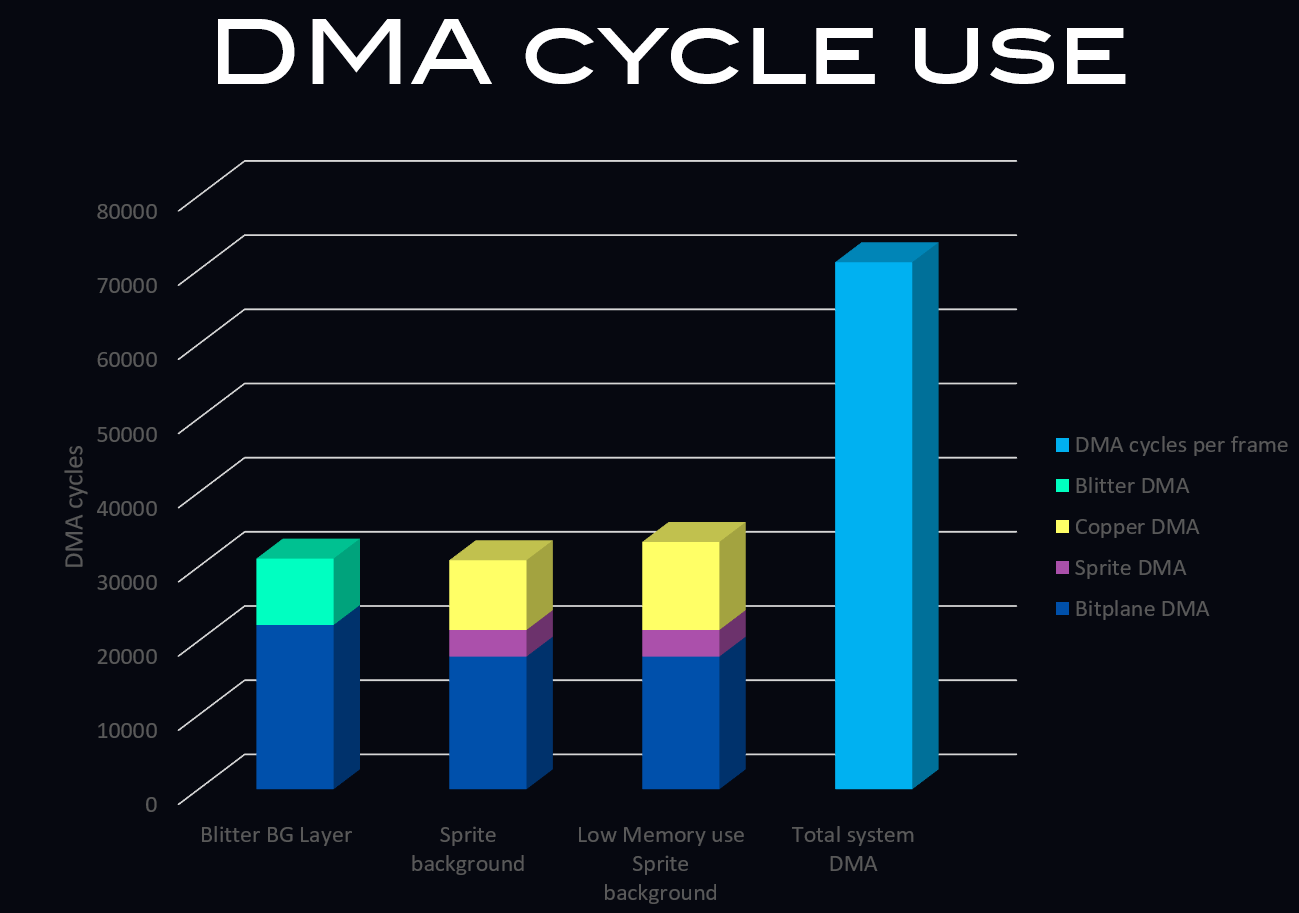
Above: comparing the DMA cycle use of each effect to each other and to the total amount of DMA cycles available to the Amiga per frame.
Similarly, the table below shows the number of DMA cycles used/free per frame for each of the variants. It also shows the types of DMA used by the effect and the number of DMA cycles used by the effect, assuming no Bobs or Sprites are being drawn on top of the effect.
show
show
show
show
Effect
Bitplane DMA*
Sprite DMA
Copper DMA
Blitter DMA
Free DMA cycles**
Blitter background
22144 (5 BPL)
N/A
N/A
8960
38695
Sprite background
17888 (4 BPL)
3584
9408
N/A
38919
Low Memory Sprite background
17888 (4 BPL)
3584
11872
N/A
36455
As can be seen in the table above the number of DMA cycles free for both the Sprite based background and the Blitter based background is quite close, with the Sprite based background offering 0,6% more free cycles than the Blitter based background. The low memory use Sprite based background is somewhat slower, at about 94% of the cycles of the Sprite based background.
For the Blitter based background, both the hardware Sprites and the Copper remain unused and such can be used for other purposes than supporting the effect. For the Sprite based background (incl. the low memory use one), the hardware Sprites are in use and the Copper spends a significant portion of time each frame repositioning Sprites.
Despite the similar number of DMA cycles available, the Blitter based background can't quite manage the same number of bobs drawn. This is purely due to the CPU overhead of setting up the extra blits needed to split bobs between a 3 bitplane and a 1 bitplane blit.
*) The example uses a scrolling display sized 288*224 (304*224 fetched), plus a 16 line static panel in 3 bitplanes. The DMA use reported is based on this.
**) The PAL Amiga has 227*313=71051 DMA cycles in total. Of these, 1252 are used to refresh RAM, leaving 69799 cycles for use by DMA or the CPU.
As can be seen in the table above, the number of DMA cycles used & free are very similar between the Sprite and Blitter based background layer. Only the Low Memory usage Sprite based background layer scores notably lower here. The reason that the Blitter based background layer doesn't score better in the number of bobs drawn per frame is purely due to the extra overhead the CPU has in setting up additional blits.
Tab 3
GFX Conversion
In order for the Blitter based background blits to be done with the minimum of effort, the example program contains a conversion routine for both tiles and Blitter objects. This routine converts standard interleaved 4 bitplane graphics into a 3 bitplane interleaved segment and a separate 1 bitplane segment. The 3 bitplane interleaved segment is blit into playfield 1 (bitplanes 1,3 and 5), the 1 bitplane segment is blit into playfield 2, bitplane 2.
This needs to be done separately because both playfield have different offsets, both at the per-pixel level and the per-word level.
The routines themselves are pretty simple, they just copy bitplanes 1,3 and 4 of the source image into one bitmap and copies bitplane 2 into a second bitmap.
Alternate palette setup
The example program currently splits the bitplanes up in three parts: bitplane 1,3 and 5 (playfield 1) are the main foreground. Bitplane 2 (part of playfield 2) is the shared bitplane where both the 4th foreground bitplane and 1st background bitplane are shared. Bitplane 4 (part of playfield 2) is the exclusive background bitplane.
However, this split can be done differently without changing the speed or memory use of the program.
The easiest alternative is to exchange bitplane 2 and 4, making bitplane 2 the exclusive background bitplane and bitplane 4 the shared foreground/background bitplane. Doing so would require a change to the palette and would change which colours end up being available for Sprites, but otherwise it's functionally identical to the split used currently (though some changes to the code will be required to set up the different selection of bitplanes).
The palette for such a setup looks like this:
show
show
show
show
show
show
show
show
show
show
show
show
show
show
show
show
show
show
show
show
show
show
show
show
show
show
show
show
show
show
show
show
show
Index
Bitplane 5
Bitplane 4
Bitplane 3
Bitplane 2
Bitplane 1
Colour
0
0
0
0
0
0
Background 0
1
0
0
0
0
1
Foreground 0
2
0
0
0
1
0
Background 1
3
0
0
0
1
1
Foreground 0 (duplicate)
4
0
0
1
0
0
Foreground 1
5
0
0
1
0
1
Foreground 2
6
0
0
1
1
0
Foreground 1 (duplicate)
7
0
0
1
1
1
Foreground 2 (duplicate)
8
0
1
0
0
0
Background 2
9
0
1
0
0
1
Foreground 3
10
0
1
0
1
0
Background 3
11
0
1
0
1
1
Foreground 3 (duplicate)
12
0
1
1
0
0
Foreground 4
13
0
1
1
0
1
Foreground 5
14
0
1
1
1
0
Foreground 4 (duplicate)
15
0
1
1
1
1
Foreground 5 (duplicate)
16
1
0
0
0
0
Foreground 6
17
1
0
0
0
1
Foreground 7
18
1
0
0
1
0
Foreground 6 (duplicate)
19
1
0
0
1
1
Foreground 7 (duplicate)
20
1
0
1
0
0
Foreground 8
21
1
0
1
0
1
Foreground 9
22
1
0
1
1
0
Foreground 8 (duplicate)
23
1
0
1
1
1
Foreground 9 (duplicate)
24
1
1
0
0
0
Foreground 10
25
1
1
0
0
1
Foreground 11
26
1
1
0
1
0
Foreground 10 (duplicate)
27
1
1
0
1
1
Foreground 11 (duplicate)
28
1
1
1
0
0
Foreground 12
29
1
1
1
0
1
Foreground 13
30
1
1
1
1
0
Foreground 12 (duplicate)
31
1
1
1
1
1
Foreground 13 (duplicate)
The reason for not using this particular split in the example is that I feel the Sprite colours of the split used are more useful in general as there is less duplication of colours inside of any given Sprite pair.
Other alternatives are also possible, such as one where one of the bitplanes in playfield 1 is shared instead of one of the bitplanes in playfield 2. Considering this would mostly be useful to increase the colour count of the background at the expense of foreground colours, I'm considering such a change as out-of-scope for this example & article.
Alternate Blitter based background effect(s)
The example I made shows a 14 colour foreground and a 4 colour background (and can fairly easily be changed to a 15 colour foreground and 3 colour background instead). However, this is not the only option for a Blitter based background effect.
Here are some alternative effects that can also be created using similar code:
- a faster variant with 2 background colours and 14 foreground colours. This is achieved by running in 4 bitplane mode instead and will increase performance significantly as it also makes drawing Blitter objects a lot faster by no longer needing two separate blits for drawing/restoring each object.
- a slightly faster variant that keeps 14 colours for the Blitter objects and 4 colours for the background, but drops the foreground colours down to 7. This is achieved by not cookie-cutting bitplane 2, but rather using a masking blit where the foreground is cut out of bitplane 2 instead of being combined with it.
- a variant using the '7 bitplane' trick to limit the background to a 16 pixel wide pattern, but improving performance significantly by no longer needing two separate blits for drawing/restoring each object.
It's possible to decrease the height of the background to less than the full screen. Doing so will return part of the performance cost of having the background in place. In case of the Sprite based background, this is easy to do by simply altering the Copper list to reposition the Sprites for fewer lines.
In case of the Blitter based background, this is a little bit more involved. Lowering the effect size itself is not an issue. This can be done by altering the height in the CCBitplanePart routine and changing the vertical offset of both halves as desired. However, doing so does mean that the method used for restoring the 1 bitplane part of the Blitter objects will no longer work properly for the entire height of the display.
One way to fix this is to cut the 1 bitplane parts of the Blitter objects into two if they cross the line between the visible effect and deal with the restore of both parts separately. Alternatively, the areas that don't have the effect can also be cleared by the Blitter every other frame (which drops the need for splitting the Blitter objects).
Another alternative is to either assign an empty bitplane to the areas without the effect, or disable the 5th bitplane in these sections and alter the palette to be correct for a 4 bitplane screen in these sections (both these options do require splitting the 1 bitplane Blitter objects for both drawing & restoring if they go over the edge between background/no background).
Another issue in changing the effect height is that the corkscrew method used for scrolling the screen can cause display glitches in the parts of the screen that don't have the effect running. This can also be fixed by clearing that segment of the background, or by disabling the 5th bitplane as pointed out above.
Sprite based background using fewer Sprites
The Sprite based background as shown in the example program uses all 8 Sprite channels. This is done to maximise the width of the background pattern.
That said, it's certainly possible to assign fewer Sprite channels to the background and instead use them for other purposes. Doing so will merely need a slightly changed Copper list. Note that as the number of Sprite channels assigned changes, the number of Copper WAIT instructions per scanlines can also change to prevent the repositioning to overwrite Sprites that aren't yet moved. The list below shows the way repositions and wait commands need to be set up for any number of Sprite channels, assuming a 4 bitplane background as used in the example.
show
show
show
show
show
show
show
show
show
Sprites
Reposition info
Copper waits
Width
8
WAIT, SPR0-7, WAIT, SPR0-7, SPR0-1
2
128px
7
WAIT, SPR1-7, WAIT, SPR1-7, SPR1-4
2
112px
6
WAIT, SPR2-7, WAIT, SPR2-7, SPR2-7
2
96px
5
WAIT, SPR3-7, WAIT, SPR3-7, WAIT, SPR3-7, SPR3-5
3
80px
4
WAIT, SPR4-7, WAIT, SPR4-7, SPR4-7, WAIT, SPR4-7, SPR4-5
3
64px
3
WAIT, SPR5-7, WAIT, SPR5-7, WAIT, SPR5-7, WAIT, SPR5-7, WAIT, SPR5-7, WAIT, SPR5-7
6
48px
2
WAIT, SPR6-7, WAIT, SPR6-7, WAIT, SPR6-7, WAIT, SPR6-7, WAIT, SPR6-7, WAIT, SPR6-7, WAIT, SPR6-7, WAIT, SPR6-7, WAIT, SPR6-7
9
32px
1*
WAIT, SPR7, NOP, SPR7, NOP, SPR7, NOP, (etc)
1
16px
*) Note that a 1-Sprite channel background will require the use of Copper MOVE instructions to the NO-OP register ($1fe), rather than Copper WAIT instructions. This is because the Copper WAIT instruction requires 3 cycles and only two are available between each Sprite update. In total, this means adding 18 Copper MOVE instructions each scanline, making a 1-Sprite background the most expensive option by far (assuming a 4 bitplane background).
The list above assumes the standard Sprite based background. In case of the low memory use Sprite based background, one more Sprite needs to be repositioned per scanline (which may or may not require an additional WAIT per scanline) and the Copper MOVES & Copper SKIP for the Copper loop must be added for each scanline.
As can be seen in the list, the number of Copper waits required per scanline gets higher as the number of Sprite channels used for the background is lowered below 6. In exchange, one or more Sprite channels become available for use. Each Copper wait added required 3 DMA cycles per scanline of the effect.
The table below shows the total number of cycles used by the extra Copper waits for Sprite based background effects with 5 or fewer Sprite channels in use and compares this to the number of lines of Sprites have to be shown for this trade-off to be worthwhile from a performance perspective.
show
show
show
show
show
show
Sprites used
Copper waits
Extra DMA cycles used
Sprite lines equivalent*
5
3
672
336 lines
4
3
672
336 lines
3
6
3360
1680 lines
2
9
5376
2688 lines
1**
18
8064
4032 lines
*) This number is the total number of 1 channel Sprite lines that needs to be displayed using the now free Sprite channels to make up for the performance cost. If two Sprite channels are used, this number is halved, for three Sprite channels it's divided by three, etc.
**) For a 1 Sprite wide background, the column Copper Waits instead denotes the number of Copper Moves added.
It's clear from the list above that dropping the background width to 5 Sprite channels or fewer tends to cost more performance than it gains by the now free Sprite channels that are available. That said, it can still be a worthwhile exchange because these extra Sprite channels usually can use their own colours without interfering with the foreground or background colours in use.
Overall, I'm really happy with the results. The Blitter based layer performs almost as well as the 128 pixel Sprite background, while still offering hardware Sprites (albeit with only 8 available colours for the Sprites). At the same time, it uses less memory than a similar Dual Playfield screen would cost to setup*. To this me shows it's a viable option for use in games despite it's compromises.
Similarly, the low memory use Sprite background also seems to me to be quite promising. It uses a bit more Copper DMA time, but it saves a significant amount of memory over the standard way of achieving this effect. That may be a worthwhile trade-off for some.
Figuring out how to get all three of these effects to fit in RAM was an interesting challenge**, though!
Above: the Dual Layer Graphics program explained and showed in action.
This is the second time I created an alternative to Dual Playfield mode, the first being the free form Sprite layer example I did a few years ago. This time around, the focus was on getting an effect that would not just be technically interesting but also offer a level of performance that would make it work in games (or perhaps demos).
Given the Blitter based effect performs roughly similar to the Sprite layer effect, I hope this is a useful example. Both of a classic effect and two alternatives to this effect which might be just as useful.
All code, apart from the startup code (by Photon of Scoopex), the joystick code (found on eab.abime.net) and the random number generator (by Meynaf, as found on eab.abime.net) was written by me and is (C) 2022 Jeroen Knoester.
That said, please do use any part of my code or this idea you find useful. A credit/mention would be nice but is not required in any way. The program, source code and a bootable .ADF can be found in the downloads section.
If you have any questions, be sure to contact me through the contact form!
*) see the 'Memory' tab in the tabbed section above for more details. As noted there, the draw-restore method of drawing bobs uses less memory than a Dual Playfield approach. However, a save-draw-restore method of drawing bobs will have the Blitter based background score slightly worse in memory use than the equivalent Dual Playfield approach, but not by much.
**) As always, this program does not use loading in of external data or crunching/packing. This is done to keep the example focussed on the effect rather than other techniques. Because I kept all code and data in a single executable, the program does require ~420KB of free Chip RAM (and 1MB of total RAM, of which at least 512KB has to be Chip RAM) in order to run.
When using one of these effects for 'real programs', the memory use will be much, much lower as a result of not needing all the extra overhead the example has for supporting multiple effects in one executable.